Basic information about the design, graphics and accessories
Drawing is a type of graphics. An image made by hand, by eye, using graphic means: lines, strokes, spots - is called a drawing. The drawing is like an independent species fine arts, and the basis for painting, sculpture, engraving, posters, decorative and other arts. Not only in works of art, but also in the most different types human activity figure plays important role, examples include pictures in textbooks, various elements design of scientific works, sketches of technical details, sketches of costumes and sketches of clothing details, product processing units and much more.
The scope of drawing is vast, but it is of exceptional importance as a means of cognition and study of reality. As in oral and writing person, and the drawings reflect the artist’s process of thinking and communication with the world.
Any object can be the object of an image, but people perceive the objective world around them differently. And although each of us has the opportunity to sense the diversity of the quality of objects with the help of vision, the visual perception of the artist is most acute. With the help of drawing, the artist learns external world, comprehends the secrets of its image on a plane and in volume.
Here we will look at drawing as a type of graphics and how independent phenomenon art.
Graphics (from the Greek grapho - I write, I draw) is a type of fine art that includes drawing and a very wide and diverse range of printed materials. works of art. We see graphics everywhere. Illustrations in books, drawings in magazines and newspapers, packaging designs for various goods, postal and banknotes, emblems, posters and much more - all these are the works of graphic artists. Compared to painting, graphics are more conventional and do not convey all the richness of color and shape of the surrounding objective world, the artist selects and highlights the most important things.
Graphics combine drawing as an independent area and printed artistic images: woodcut (woodcut), metal (etching), stone (lithography), linoleum (linocut), cardboard and other types based on the art of drawing, but having own funds artistic expression.
Unlike works of printed graphics, which can be replicated in many copies - prints, the drawing is unique. 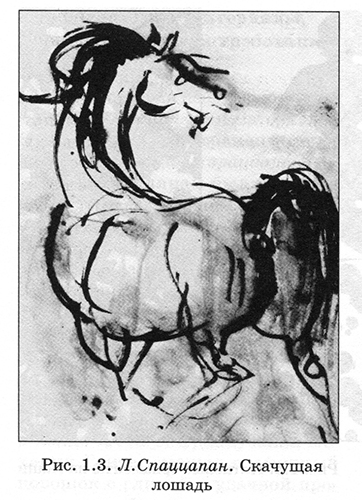
Drawings may vary in technique and nature of execution, purpose, genres and themes. An easel drawing has an independent meaning - it is a carefully crafted work made on an easel (an artist’s machine) on a separate sheet. These can be drawings of various genres: landscapes, portraits, still lifes, drawings for household and historical topics etc. Depending on the time of execution, drawings can be long-term or short-term. In contrast to lengthy drawings, in sketches and sketches the artist quickly records his impressions of what he sees. In preparatory drawings and sketches, artists, sculptors, and designers embody the initial ideas of their projects.
Means of artistic expression in graphics
Like any type of fine art, drawing has its own figurative language. Line, stroke, spot, tone, chiaroscuro are the means of artistic expressiveness of a drawing. Various combinations These tools allow you to create light and shade and tonal effects.
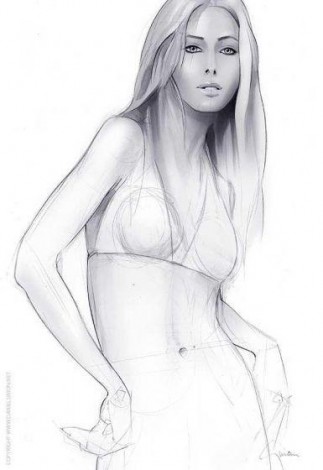
Main means of expression drawing - line. Its role in drawing is complex and responsible: it is inextricably linked with the essence of what is depicted and is the result of an artistic understanding of reality. The artist's line is different from the drawing line. It sometimes thickens, sometimes becomes thinner, sometimes strengthens, sometimes weakens, and can be rigid, angular, insecure and timid (Fig. 1.1). The line conveys not only the character of the depicted object, but also emotional condition the artist himself.
The emotional palette of the line is varied. How plastic and expressive the line is in V. Mukhina’s sketch (Fig. 1.2) and how dynamic it is in L. Spazzapan’s drawing (Fig. 1.3).
A stroke is a short trace of a pen or pencil, simplest element drawing techniques. A system of strokes conveys space, reveals the volumetric-plastic properties of objects, their texture, and creates expressive effects of dynamics, light and shadow.
The drawing by the French artist J. Seurat (Fig. 1.4), depicting a singer on the stage, amazes with the magic of space and light. It is made with a pencil, but not with an ordinary pencil stroke, but with a soft, uniform shading, creating, as it were, blurry, unclear outlines of figures and objects.
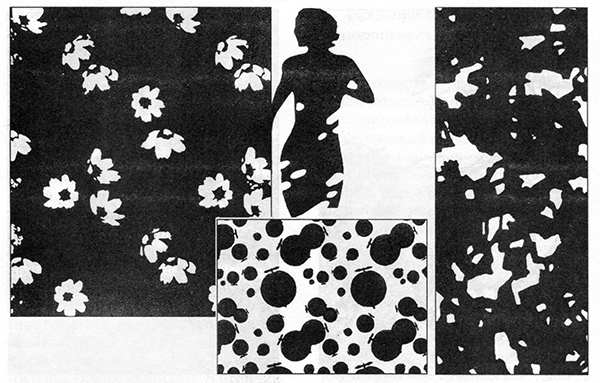
If the circuit linear drawing fill from the inside even color, you get a silhouette - a spot - a flat color image. A spot with apparent non-plasticity can reveal an infinite variety of states. Using a spot you can express not only the shape, but also the character of the model and the plot situation (Fig. 1.5). They masterfully use stains in the art of textiles, which always tend to be flat.
Ability to work with stains - important quality for craftsmen who create designs on fabric (Fig. 1.6).
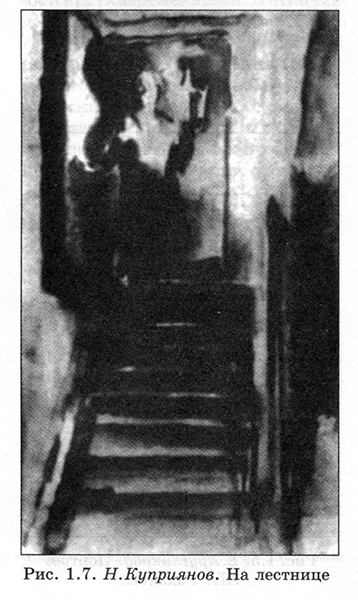
The spot pattern may not be a silhouette. For the most part it is based on the use of gradations of tone, i.e. gradual transitions from dark to light. The drawing by N. Kupriyanov (Fig. 1.7) was made in black watercolor, but there is some poetry and mystery in this sketch.
Graphic materials, accessories and requirements for them
Many tools and materials are used for drawing. The most common of these is the graphite pencil. Already the ancient Romans knew a pencil, but only a silver or lead one. In the Middle Ages, tin and an alloy of tin and lead were added to it. However, such pencils could not be obtained widespread. The revolution was made by the discovery of graphite in the second half of the 16th century. in England. But graphite pencils had disadvantages - they got dirty and did not stick well to paper. And only in late XVIII V. The French mechanic Gonte, having mixed graphite powder with clay in the right proportion, invented the pencil that we still use today.
Graphite pencils are produced various degrees hardness Domestic pencils have 13 degrees of hardness, the harder ones are designated by the letter T (from 1T to 7T), the softer ones by the letter M (from 1M to 5M); imported pencils - N and V, respectively.
Relatively soft pencils of the TM, M, 2M - 5M brands are most suitable for drawing. They can make lines of varying thickness and a range of tonal gradations from the lightest to almost black, which is achieved by shading.
Charcoal is also widely used in drawing, which is distinguished by its large expressive possibilities. It gives a deep velvety black color and various tonal transitions. They perform quick sketches and long drawings. Charcoal can be drawn into a thin line and quickly covered large plane tone. Charcoal drawings should be secured with a special fixative.
Charcoal goes well with other materials - sanguine, chalk, pastels, colored pencils and a special “Retouch” charcoal pencil.
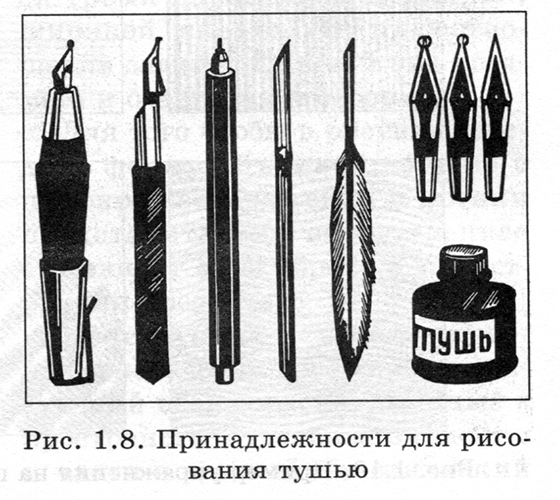
Drawing with a pen develops the hand and eye well. Feathers are used for drawing with liquid dyes: ink, ink, stain, watercolor. The pen has been known for a long time as an artist's tool. In the old days, goose, swan, crow, peacock, reed and straw feathers were used. Currently, metal feathers are common in artistic practice. different forms and sizes (Fig. 1.8). 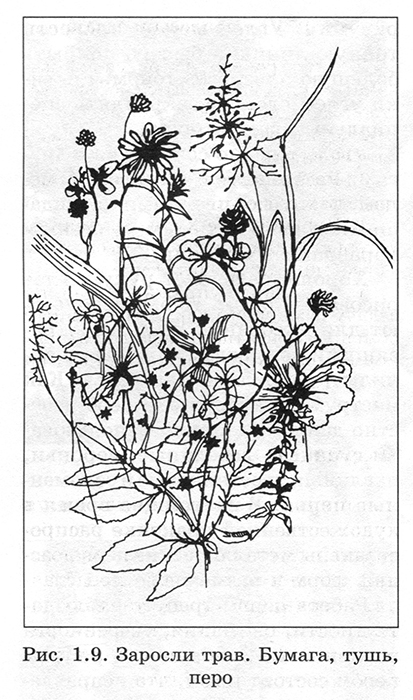
Working with a pen requires observation, attention, confidence and precision. The peculiarity of working with a pen is that corrections are almost impossible. By changing the pressure of the pen, you can achieve lines of varying thickness. Steel feathers give a clear and thin line, while goose and reed feathers give an expressive and lively line (Fig. 1.9).
A variety of graphic effects can be achieved with colored pencils. By blurring watercolor pencils with water, you can get painterly effects.
Graphic work is mainly performed on paper, the selection of which must be selective. There are different types of paper. For quick drawings with pencil or paint, thick white paper with a slightly rough surface - Whatman paper or half-Whatman paper - is better suited. For short-term drawings and sketches made with soft graphic materials (very soft pencils, charcoal, sanguine, etc.), paper of different quality is used: wallpaper, wrapping paper, newspaper, etc. Smooth, without roughness, thick white paper is suitable for working with a pen.
For educational drawings use paper 1/2 or 1/4 size of a standard sheet of drawing paper. It is better to store sheets of drawing paper in a special folder rather than on a roll, since a curled sheet is difficult to attach to an easel or drawing board.
The set of drawing supplies also includes a folding knife or scalpel and a soft elastic band cut diagonally, since it is more convenient to eliminate unnecessary lines with a sharp end.
Knowledge art materials and the technique of working with them helps to realize creative ideas and make drawings more expressive.
Three-dimensionality. Form. Volume
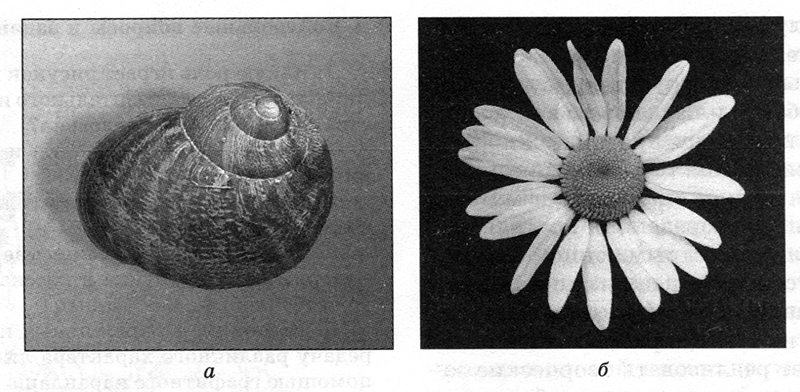
The world around us is rich in a variety of forms. Everything we see around us has a form that the best way characterizes any object (Fig. 1.11, a and b). When it is necessary to graphically represent an object on a plane, we focus our attention on the form. Any form that has already passed through our visual perception can be associated in consciousness with other similar forms, with which our imagination will create certain relationships and connections. For example, a spot of paint can be associated with a face, and in the outline of clouds you can see a lying dog, a running horse, and much more.
The expressiveness of the form of the depicted object is very important for the artist, because it determines the type of models he creates. On a flat sheet the artist creates an image in which the viewer sees volumes and space. In order for the painter to succeed, he must learn to perceive all visible space three-dimensionally: when drawing an object from one side, it is as if he sees it from all sides. The artist must consciously represent the structure of the object, the laws of its construction, and not “copy” the contours, light and dark spots without meaning.
Any form created by nature or man is based on geometric bodies, from which learning to draw begins.
The volume of an object is characterized by three parameters: length, width, height. Depends on their ratio appearance an object and the outline of its shape.
In order to convey a three-dimensional form in a drawing, you need to imagine it using imagination and logic internal structure, i.e., understand the design of the object.
The design is structural basis form, its frame, connecting individual elements and parts mutually located in space into a single plastic volume.

In order to understand the structural features of the form and its design, the method of through drawing is used in the drawing (Fig. 1.12). 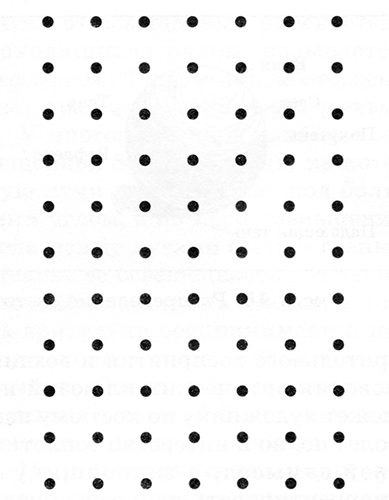
Based on their shape, objects can be classified as simple or complex. Complex shapes They are a combination of different surfaces (flat, convex and concave). An example would be the shape of a car.
Simple shapes of objects can be divided into faceted and round. The surfaces of faceted geometric bodies are formed by flat faces - these are cubes, prisms, pyramids. The surfaces of round geometric bodies are formed by the rotation of a flat contour around its axis - these are a ball, a cylinder, a cone. They are characterized by curved surfaces - spherical or cylindrical.
When starting to draw, you need to carefully examine the depicted object from all sides in order to get a clear idea of its volume. Next, to clarify the design of the object, make several sketches, using the method of end-to-end drawing, in which to outline the axes and characteristic lines of the sections.
Optical illusions. For correct image The shapes of objects need to become familiar with perception. Artists encounter a number of phenomena called optical illusions. Studying and taking them into account will help to avoid visual distortions of objects. Psychologists have noticed that our consciousness tends to group things into simple units. Points located on equal distance from each other and representing unrelated objects, in our minds they are organized into rows and columns (Fig. 1.13).
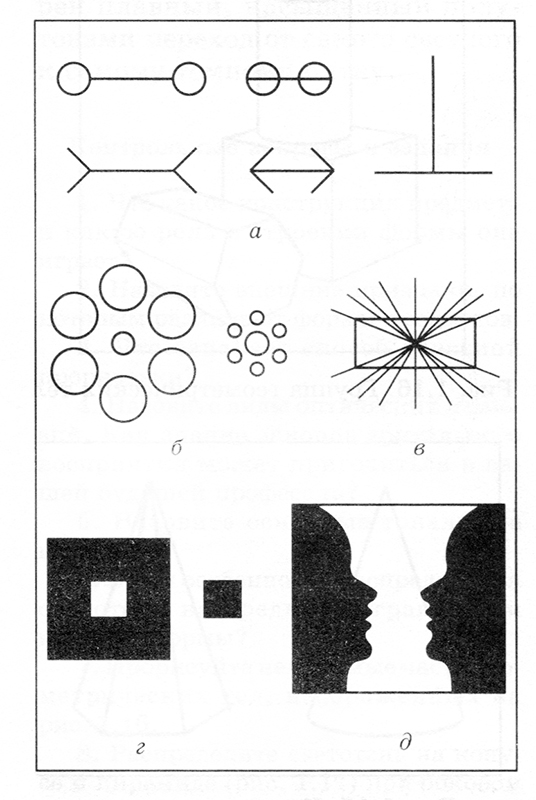
In Fig. 1.14, a - illusions that arise when comparing the lengths of segments. Optical illusions can also appear when comparing geometric shapes(Fig. 1.14, b). The same objects may appear larger when surrounded by small ones and small when surrounded by large ones. The perception of a geometric characteristic can be distorted if the sides of the rectangle are crossed by many rays emanating from the center (Fig. 1.14, c). These rays seem to transform the parallel straight lines of the sides of the rectangle into curved ones. A white square on a black background seems larger than a black one on white, although they are the same (Fig. 1.14, d). Optical illusions are the result of our own minds. For example, the so-called ambiguous drawings, which clearly demonstrate how the perception of one and the same object gives an alternating image and is read as a figure, then as a background: now we see two dark profiles on a white background, now a white vase on a dark one (Fig. 1.14, d).
Knowledge of the peculiarities of perception of form will help you create accurate and expressive drawings and interesting compositions. In artistic design modern clothes knowledge of laws visual perception and emergence optical illusions will help the costume designer to realize his plan in the most complete and interesting way, and the cutter to correct some of the shortcomings of the customer’s figure.
Chiaroscuro and its patterns.
The volumetric form is conveyed in the drawing not only with the help of constructive construction, but also with the help of chiaroscuro. Any three-dimensional object is limited by curved or flat surfaces, which, when illuminated, fall into different light conditions. Light, spreading across the form, depending on the nature of its surface, has different shades - from the lightest to the darkest.
The degree of surface illumination depends on the distance to the light source: the further the light source is from the surface, the weaker it is illuminated, and vice versa. The apparent lightness of the surface of an object also depends on the distance between the object and the viewer. When removed, light surfaces gradually darken, and darkened ones lighten.
The angle of incidence of light rays on the surface also plays a significant role in the degree of illumination of the surface. The most intensely illuminated surface will be the one on which the light rays fall at right angles, i.e. perpendicular. The smaller the angle of inclination of the light rays to the surface, the weaker it is illuminated.
The lightness of an object depends on the color and texture of its surface: a glossy surface will reflect light more than a matte and rough one. Dark surfaces absorb more light rays and reflect less. On very dark or very light surfaces, the gradations of light are poorly distinguished, since our eye is not able to distinguish between too weak or too strong light stimulation.
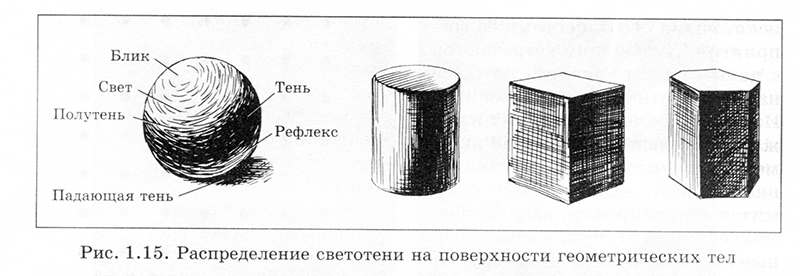
As an example of the distribution of chiaroscuro on various surfaces depending on the angle of incidence, let us consider chiaroscuro on the simplest geometric bodies.
Based on forms various items the simplest geometric bodies lie. Knowing the laws of light and shadow distribution on spherical, cylindrical and flat surfaces, you can understand the light and shadow of any object with a complex shape.
In order to better imagine the nature of the distribution of light and shade on the surface of geometric bodies, imagine that they will be illuminated with strong lateral light with backlighting shadow sides reflected rays from a nearby white vertical plane (Fig. 1.15).
The part of the surface of the body that is hidden from the light source and is in the shadow is called its own shadow, and the illuminated part of the surface is called light. The degree of illumination of a curved surface is determined by the angle of incidence of the light rays: the most illuminated area will be the area on which they fall at a right angle. Where the rays only glide across the surface, penumbra is formed. As you approach the shadow line, the angle of incidence of the light rays decreases. On smooth shiny surfaces the light source is reflected and the brightest place is formed - glare. The illumination of a shadow by rays reflected from illuminated planes located nearby is called a reflex. The shadow cast by an object is a falling shadow.
For polyhedra, the most illuminated face will be the one on which the light rays fall at a large angle, and as the angle between the light rays and the face decreases, the degree of its illumination decreases. Each face of the polyhedron is visually perceived as unequally illuminated at all its points. A light surface bordering on a dark one will appear lighter, and a dark surface will appear darker.
On cylindrical, conical and spherical surfaces, the transition from light to shadow will occur gradually, without a sharp change in light-and-shadow ratios. Such surfaces are characterized by a smooth, saturated halftone transition from the lightest to the darkest spot.
Proportions 
Proportions are the dimensional relationships of parts of a form with each other, as well as between different forms.
The sense of proportion is one of the main things in the drawing process. Compliance with proportions means the ability to subordinate the sizes of all parts of the depicted object in relation to each other and to the whole.
For example, in order to draw a still life from several household objects, it is necessary to determine how they relate to each other in size: height, width, volume, weight. Having established the proportional relationships between objects, they move on to identifying the proportionality of the parts of the form of a single object. Thus, establishing relationships between objects and between parts of the form separate subject, we identify their proportional characteristics. Therefore, the basis of proportions is the method of comparison.
The proportionality of the parts of the form creates its beauty. When we admire the works of masters of the past, we are struck by their amazing harmony, which is largely determined by such an aesthetic quality as the proportionality of the whole and details.
Artists different eras sought to understand the proportional patterns of objects in the surrounding world, and especially human body.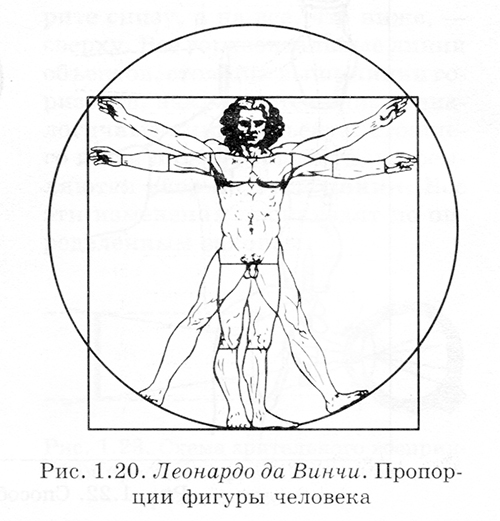
IN Ancient Egypt To depict the human body, a special canon was developed, according to which parts of the human body were measured with mathematical accuracy. The Egyptians based the division of the figure on 21 parts (Fig. 1.18), and the figure itself accounted for 19 equal parts and 2 parts - for the headdress (pharaoh's crown). Rules for the image were set standing man, walking, sitting, kneeling, etc. T9.K LS6 rules were developed for the depiction of a lotus flower, sacred animals and birds. When creating reliefs and paintings, the Egyptians used special grid-tables, which were applied to walls and stone slabs. The artist had to know the rules established by the canon and follow them using a grid table.
The ancient Greeks based their visual arts on the image wonderful person. They argued that a strict pattern reigns in the world, and the essence of beauty lies in harmonious order, symmetry, and the harmonious unity of parts and the whole. These provisions formed the basis of the canons created by the Greeks. In 432 BC. e. The sculptor Polykleitos wrote an essay on the proportions of the human body, which was called “Canon”. To illustrate his theory, he created a statue of "Doriphoros", which means spearman. This statue of a young athlete served as a model for artists. Artists Ancient Greece discovered a system of proportions, which later became known as “ golden ratio" The essence of this proportion is that the sum of two quantities is related to the larger quantity, just as large value refers to the smaller one. An example of dividing segment AB according to the “golden section” principle is shown in Fig. 1.19 (AB: AC = AC: SV). Approximately in whole numbers, the "golden ratio" is expressed as 5:3; 8:5; 13:8; 21:13, etc.
Knowledge of the law of the “golden section” played a significant role in ancient architecture, painting and sculpture. If ancient artists intuitively followed the principle of the “golden ratio” in search of harmony, then it was theoretically described in the Renaissance. Leonardo da Vinci, based on the experience of the ancients, developed a system of proportions of the human body. Creating rules for depicting the human figure, he made a drawing diagram that clearly shows the proportional pattern of parts of the human body (Fig. 1.20).
Among the Renaissance masters who dealt with the theoretical foundations of drawing, a prominent place belongs to the German artist Albrecht Durer. Having written several books on human proportions, he strove to scientific justification topics, attached to the texts a large number of drawings, diagrams and drawings.
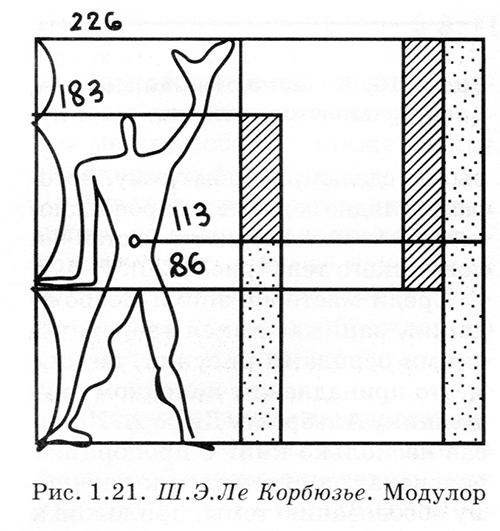 The problem of ideal proportions worried artists in subsequent eras. In 1947, the French architect S. E. Le Corbusier developed the modulator - a system for dividing the human figure in accordance with the principle of the “golden section”. On this basis, a school of models for architectural planning and design was created. In this system, the human figure is divided into segments from the foot to the waist, from the waist to the back of the head, from the back of the head to the fingertips of the raised hand (Fig. 1.21).
A developed sense of proportion largely determines success in drawing. Practice shows: the more accurately the proportions are found, the brighter and more expressive the drawing. The correct selection of proportional relationships has great importance when designing a costume. Co-size and successful organization of the parts of the costume help to make the human figure attractive and hide some flaws. And not only in the field of clothing design, but also in any artistic and design activity, proportionation plays an important role.
IN visual arts, when drawing from life, the proportions of objects can be checked by sighting (Fig. 1.22). 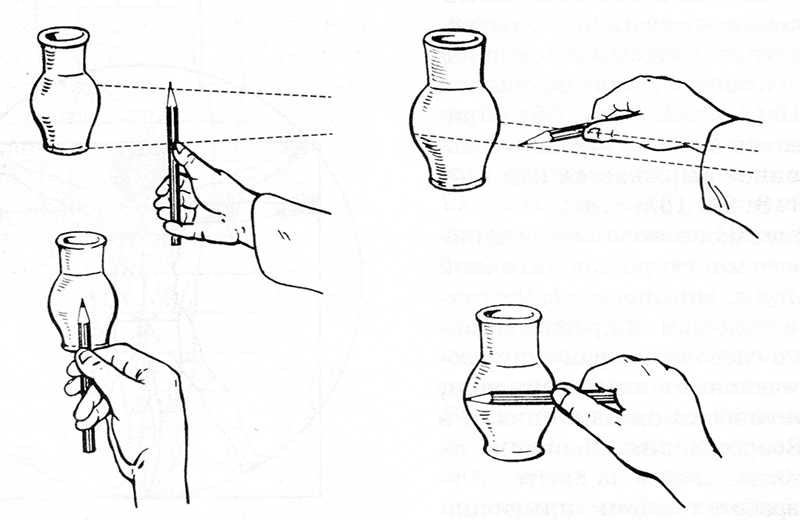 This is done like this: we press the pencil with the ring and middle fingers to the palm, and thumb moves along the pencil and serves to mark it required sizes. The pencil is held on a horizontally outstretched hand between the subject and the eye. It can tilt both to the right and to the left depending on the position of the object being measured, but in this case the pencil must be in a position strictly perpendicular to the main line of vision. Without these conditions, measurements will be erroneous.
Using the sighting method, you can determine how many times the width of an object fits into its height, clarify the degree of inclination of the shape axes, etc. However, the sighting method should not be abused, since it inhibits the development of the eye, which is trained through systematic exercises. Measurements by eye may be more accurate measurements by sighting, if a sense of proportion is developed.

Basics of Perspective
When learning to draw from life, as well as from memory and imagination, you need to know theoretical basis constructing realistic images. Considering the world, a person cannot help but notice that objects, moving away, decrease in size.
The explanation for this lies in the properties of our vision. The objects we see are necessarily illuminated in one way or another, otherwise we would not see them. The rays reflected from illuminated objects are perceived by our eye and cause irritation of the nerve endings in its retina. This irritation in our consciousness is transformed into visual image. In Fig. Figure 1.23 shows a diagram of visual perception, which shows that due to optical properties two-piece eyes equal size the nearest one is larger, and the more distant one is smaller. 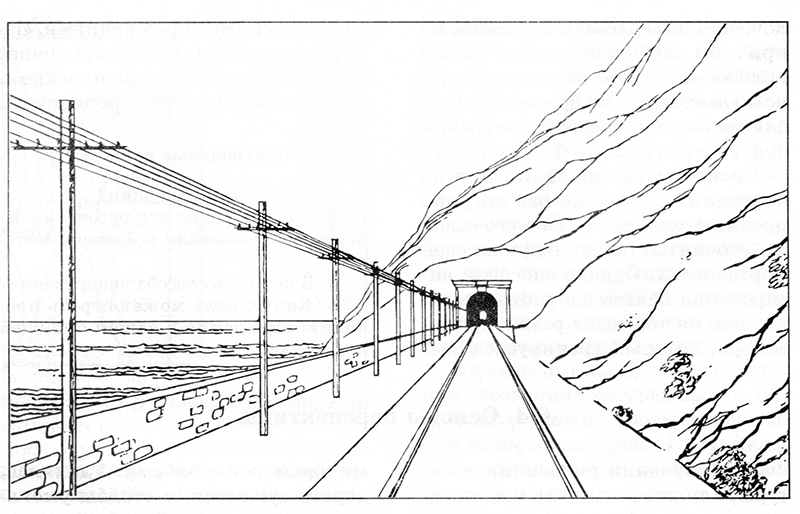
A classic example of a promising reduction in size is a road running into the distance with pillars running along it. Moving away, the road narrows, and the pillars become smaller until they converge somewhere on the horizon into one point (Fig. 1.24).
The horizon is not always visible - you won’t see it in the city or in the forest. In this case, it must be presented. main feature The horizon line is that it always passes at eye level of the observer. You look at everything above the horizon line from below, and at everything below you look at it from above. All horizontal lines objects standing above the horizon line slope down, and similar lines of an object standing below the horizon line slope upward towards this line. All these changes occur according to certain laws.
Studying the patterns of images on a plane visible world in accordance with optical features and physiological properties Our vision is concerned with the science called perspective (from the Latin perspicio - I see clearly). The image itself, made in accordance with the provisions of this science, is also called perspective. The perspective method was developed during the Renaissance. One of the creators scientific theory perspective was the early Renaissance architect Filippo Brunelleschi in collaboration with the mathematician Paolo Toscanelli. Then Italian and German artists Pierodella Francesca, Paolo Uccello, Leonardo da Vinci, Albrecht Durer and others in their scientific works and works of art developed previously discovered laws.
IN fine arts Three types of perspective can be distinguished: observational, linear and aerial. Observational perspective is a set of rules derived from the experience of direct observation. In this case, the artist, when conveying a full-scale image, is based not on precise geometric calculations, but on his own vision and analysis. Unlike observational perspective, linear perspective is a system of various methods geometric construction perspective images on a plane. Aerial perspective is a particular section of observational perspective and speaks of the change in color and clarity of the outline of objects as they move away from the viewer under the influence of the atmosphere. It is mainly used in painting.
Before you begin learning the basics of perspective, there are a few concepts you should familiarize yourself with. Everything that a person can cover with one glance, without moving or moving his eyes, is called the visual field. It is within a visual angle approaching 60°, but the clearest perception is within a visual angle of about 30°.
If we look at the same object, moving now to the right, now to the left, now crouching, now straightening up, it will appear to us differently each time. The position of the observer's eyes in relation to the observed object is called point of view.
When looking out the window from the room we see large space with houses, trees or other objects located at different distances. If we trace their outlines on glass with paint, we will get a contour image of objects located in space. In this case, the glass will be the picture plane. Looking at the full-scale setting, the painter seems to imagine an imaginary picture plane in front of him, on which objects are visible as they should be depicted on paper.
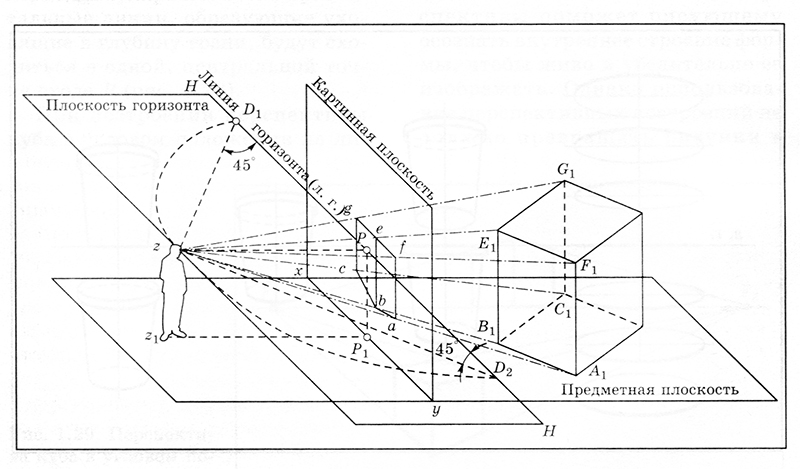 The horizontal plane of the ground, floor or table on which the depicted objects are located is usually called the object plane.
Points on the horizon that visually converge parallel lines, going deep into the picture, are called vanishing points.
For each group of parallel lines, no matter where they are in the picture and no matter what objects they belong to, there is only one vanishing point. Parallel lines, located at right angles to the horizon, go to one point, which is located opposite our eyes and is called the main point. In Fig. 1.25 shown spatial model constructing a perspective image.
Lines perspective. Lines that are parallel to the picture plane in nature are called frontal. In the drawing they have the same directions as in nature, no matter how far away they are. All frontal lines, no matter what position they are in, do not have vanishing points.
The lines that are directed into the depth of the picture can be perpendicular to the picture plane or go to it at different angles. An object appears to us to become smaller as it moves away from the eyes, and parallel lines directed inward appear to approach each other at the vanishing point.
Square and circle perspective. A square in perspective will be either a trapezoid if its two sides are parallel to the picture plane, or an irregular quadrilateral if the plane of the square is located at a random angle. In the first case, two sides of the square will be parallel to the horizon line, and the sides going deeper will converge in central point descent P (Fig. 1.26, a). In the second case, the sides of the square will be directed to the vanishing points Fx and F2, located to the right and left of the central one (Fig. 1.26, b).

 A circle in perspective looks like an ellipse (Fig. 1.27). The closer to the horizon line, the narrower the ellipse becomes, and when it coincides with the horizon line, it turns into a straight line. When constructing the perspective of a circle, you should pay attention to the fact that the front half of the circle will be larger, and the back half will be smaller.
Cube perspective. It is best to understand the principles of changing shape in perspective using the example of such a simple geometric body, like a cube. There can be two main, characteristic positions of the cube in relation to the picture plane: frontal (planes located parallel to the picture) and at an angle. In the first case, the perspective is frontal, and in the second - angular.
In the frontal arrangement of the cube, two of its faces are parallel to the plane of the picture, and the rest are perpendicular to it. The horizontal lines forming the edges going into depth will converge at one, central vanishing point P (Fig. 1.28). 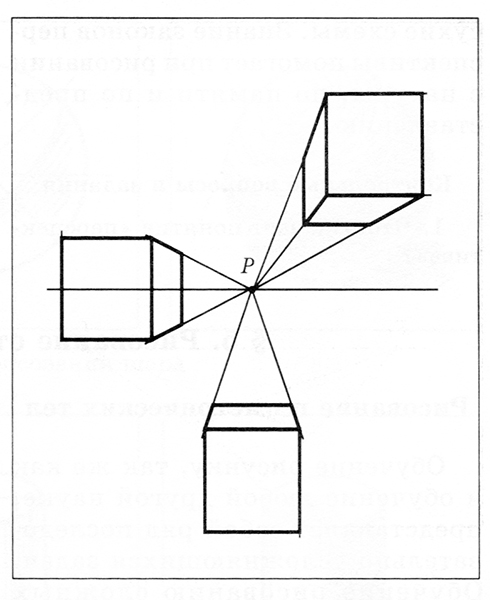
When constructing a cube perspective in an angular position, there will be two vanishing points Fx and F2 on the horizon line, located to the right and left of the central one (Fig. 1.29). Moreover, one or even both vanishing points may be outside the picture.
Knowledge of the laws of linear perspective will help the painter to understand the internal structure of the form in order to depict it vividly and convincingly. However, the use of perspective constructions should not turn the drawings into dry diagrams. Knowledge of the laws of perspective helps when drawing from life, from memory and from imagination. 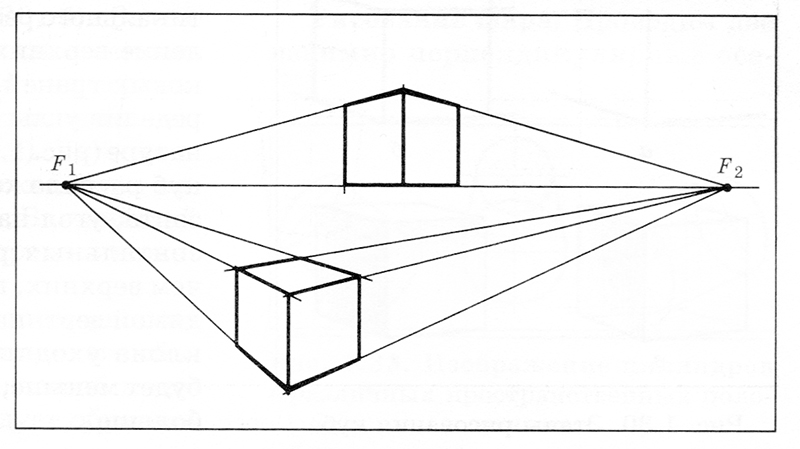
Let's figure out what we need in order to draw well? Newbies all immediately say what is necessary buy all expensive stationery, all possible pencils, paper, paints, sharpeners, etc. Actually this is not true.
Naturally, it won’t be superfluous if you have all this, but is it worth spending all your money on it? You can ask any artist what they use to create masterpieces.
The answer will always be the same: it doesn’t matter how or what to create, the main thing is to do it from the heart.
And indeed it is. You can take regular A4 paper for photocopies and create indescribable masterpieces. In order to learn how to draw well with a pencil, you need more practice, perseverance, and, as one of the greats said, 5% talent and 95% hard work.
All beginners are afraid to start - that's a fact! The first steps may seem so difficult that you don’t even want to start. But I strongly recommend reading this article to the end. I am more than sure that anyone can learn to draw beautifully by taking a short course.
From my own experience I can say that you can even teach a monkey to smoke. Just recently I could barely draw the little man from the cartoon “Octopussy”, which is sung about in the song:
Dot-dot, comma,
Minus, the face is crooked.
Stick-stick, cucumber,
So the little man came out.
I took several video tutorials, tried it, even tried making comics (). As a result, I ruined a bunch of paper and broke a bunch of pencils until I started studying the issue pencil drawing from the inside. I wanted to know what the secret of this art is? As possible using an ordinary pencil (which actually does not shine with an abundance of functionality, unlike Photoshop)
you can create amazing paintings, portraits and still lifes.
In this lesson I will tell you about pencil drawing technique.
First, let's take all the tools we need. For a regular sketch we will need a dark pencil, let's start with 6B.
Here I will go a little further from the topic. I'll tell you what types of pencils there are. They are poured due to their hardness. A very hard pencil is labeled 10H, while 10B is the softest pencil. The golden mean is considered to be NV. There are also pencils marked F, they are very similar to HB, but differ in a different shade. All N pencils leave a thin gray mark, while soft ones, on the contrary, leave a dark and rich mark. If you need hard lines in your drawing, use H, and if you need depth, then use B pencils. This is basically all you need to know about pencils on initial stage. Next we will look at this topic in more detail.
Let's go back to our lesson. Take an eraser, a pencil sharpener and paper, any will do. I took a regular office A4. Carefully lay all this out on the table, and place the object that you will draw in front of you. It is also important that this object is at eye level, so as not to strain your neck while looking at its details and shapes. Now let's get down to business!

Pencil Drawing Basics
So we have paper, pencil, eraser and good mood. Hmm, is this enough? No! You also need such a component as the ability to see the main features of what you are going to to draw with a pencil. Before you start drawing, carefully examine your object, observe how it is positioned, how the light falls on the object. Lighting is very important factor, which you should pay attention to when adding strokes to a sketch. Pay attention to whether there are bright spots or, on the contrary, shadows.

There is another very important point! Many people don't know that pencil drawing technique like any other species human activity requires warming up and warming up. Before you start drawing, be sure to do a few practice strokes. (Read the next lesson on how to do shading correctly:). I recommend that you simply draw circles, vertical and horizontal lines, and diagonal lines along the contour of the paper for 5-10 minutes. When performing these exercises, it is important that your wrists do not touch the paper, or at least press lightly on it. This will help you to be more relaxed when drawing, your hands will move more freely.
The most important thing is to believe in success, and try to discard all banal stereotypes. After all, they are the ones who prevent us from moving forward and learning new things.
Don't forget to watch the continuation of this lesson: . You will learn what types of shading there are, and also what exercises artists need to do.
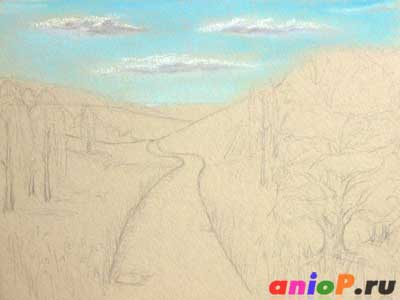
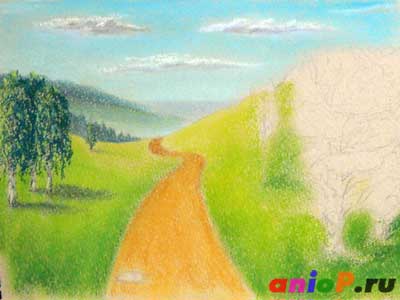
Hello! In this article I will talk about the main laws of linear and aerial perspective. As a rule, these laws are most often applied when painting landscapes. The application of the laws of linear and aerial perspective allows us to most truthfully convey the depicted space in the landscape. And in order not to be unfounded and not to write an article for the sake of an article about the theory of linear and aerial perspective, let’s consider these laws on a specific practical example. Let's draw a simple landscape. And at the same time, we will analyze each rule sequentially.
As tools, I suggest taking dry pastel, A4 pastel paper and kneading paper. I took the paper gray, but you can use white. First, as always, let's make a sketch. I decided to sketch it out of my head as my hand took it. But before that, let's remember rules of linear perspective:
- parallel lines moving away from the observer into the distance come closer and converge at one point on the horizon line (remember a road or rails going into the distance)
- identical items and objects, when moving away from the observer, seem smaller in size and converge at one point on the horizon (remember the pillars along the road)
This means we need to mark the horizon and sketch out objects that will satisfy the rules above. This is what I came up with when sketching with a simple pencil:
I decided to cover the horizon with hills so that it wouldn’t look like a boring straight line. On the left side I showed trees that decrease in size as they move away (2nd rule of linear perspective). And in the center of the landscape, there is a road stretching into the distance, which tends to one point on the horizon (1st rule of linear perspective). For added interest, let part of the road get lost behind the hills.
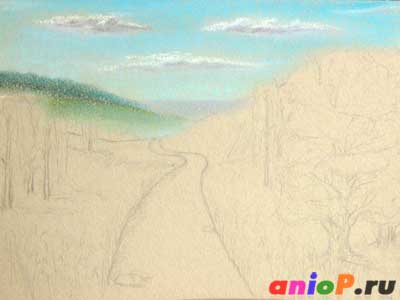
We've dealt with linear perspective. Now let's get busy laws of aerial perspective and open the box of pastels. Let's paint the sky blue, slightly decreasing the color towards the horizon. Let's add a couple of clouds. Let the sun be on our left side.
Reading first law aerial perspective - Using purple and blue crayons we will walk along the farthest hill. We'll paint the forest in the distance on the left with dark green and blue, but also mix in a little white so that the color looks pale and gets lost in the distance of the purple hill.
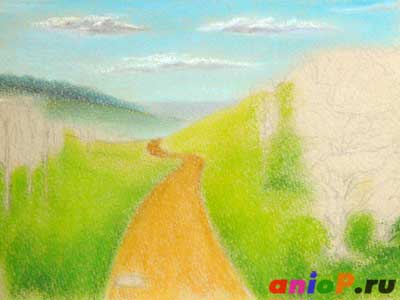
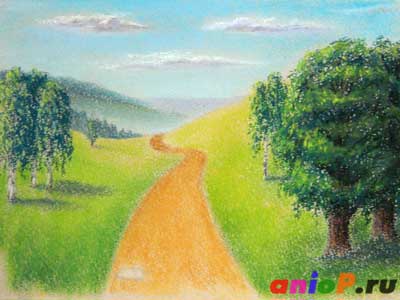
Second Law aerial perspective - We paint the fields on the left and right so that the dark green color close up smoothly turns into light or yellow-green in the distance. The path, on the contrary, near it will have light shades of ocher, and in the distance we will add a little brown. We shade the whole thing with our fingers, giving the picture a uniform tone and smooth color transitions.
Third Law aerial perspective - We will do this with the trees on the left side of the path. First, we will paint the forest behind the birches with dark green. It will highlight the hilly terrain. Against its background we will show a separate tree, which looks very small and creates the effect of remoteness in space. Let's add a barely noticeable gray shadow to it. Further using different shades green foliage with short strokes of chalk. We put light colors on the left, dark ones on the right side of the trees. Because We are drawing birch trees, then we will outline the trunks with white and lightly show the spots with dark gray. Don't go into detail. We only make hints, like a light sketch. The viewer’s imagination will already understand that these are birch trees. And excessive detail will contradict the following law.
Fourth Law aerial perspective - We actually started to follow it when we started drawing birches that were more detailed compared to the background. Let's continue on right side from the path. First, let's draw a birch tree.

Then the oak trees in the background. At the same time, oaks will have even more details compared to birches (of course, as far as the paper with its texture allows). Don’t forget to add a green-blue shadow mixed with dark gray or black under the oak trees.
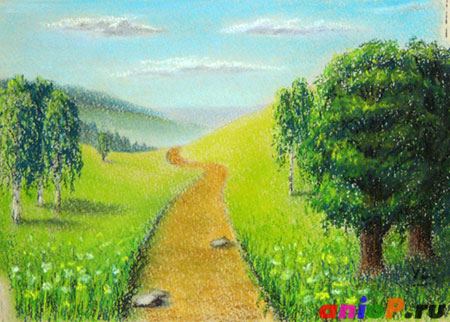
Let's consolidate the fourth law and draw grass nearby using the sharp edge of the pastel with vertical strokes. On the path on the left we will add a little shadow in blue. Just don’t forget that the shadow will become lighter as it moves away from us. You can even add a few flowers for decoration)

Well, the last one, fifth law aerial perspective- To remember this law, we emphasize the shadow of the path on the left is dark brown. But only about half. The rest of the path is softly blurred earlier. Let's add some details to the track in the form of horizontal brown stripes. The closer to us, the sharper the strokes. Let's draw a couple of stones. The one in the distance, we simply outline the main shape and emphasize the shadow. If necessary, shade it a little. We clearly highlight the contours and shadows of the nearby stones. Thus, those objects that are closer to us appear sharper than those that are farther from us.
That's all, you can sign. Of course, the result is not a hyper-realistic landscape, but I hope you have learned and remembered the main rules of linear and aerial perspective.
So let's say it again laws of aerial perspective:
First law: Objects distant from the observer appear blue, indigo, violet, or whitish depending on the density of air between the observer and the object. Second law: Light objects in the distance become darker, and dark objects become lighter. Third law: Nearby objects are depicted three-dimensionally and different colors, distant - flat and identical in tone. Fourth Law: Near objects are depicted in detail, while distant objects are depicted in general terms. Fifth Law: The contours of near objects should be sharp, and those of distant objects should be soft.
Applying the considered laws of linear and aerial perspective, your work will be an order of magnitude different in more better side from the works of artists who ignore these laws. Therefore, always keep them in mind when drawing your paintings.