Bend, Distort and Warp in Photoshop
Sofia Skrylina, teacher information technologies, Saint Petersburg
You can deform fragments and objects in Photoshop using both the Edit menu commands and the use of filters. Most of the filters used for deformation are included in the Distortion group, and in addition, three filters - Distortion Correction, Plasticity and Perspective Correction - are located separately. All these tools will be discussed in this article. It should also be noted that Photoshop offers a special tool for warping text, which we will also look at.
Menu commands Editing
If you expand the menu Editing(Edit) and then select the submenu Transformation(Transform), you will see a list of commands that allow you to transform a fragment of an image. Let's list them: Scaling(Scale), Turn(Rotate) Incline(Skew) Distortion(Distort), Perspective(Perspective) and Deformation(Warp). However, access to these commands can be obtained much faster - through the free transformation mode, which is entered by the key combination Ctrl + T (in Mac OS - Command + T), and exited by the Enter key (in Mac OS - Return). To enable a particular command, use the following techniques:
- To scale a fragment, move the mouse pointer over one of the markers of the resulting transformation frame and hold the mouse down with the button pressed. The Shift key allows you to maintain the proportions of the fragment, and Alt scales from the center.
- If you move the mouse pointer to any vertex of the transformation frame, it will take the form of a curved arrow, moving which causes the fragment to rotate. Before rotating a fragment, you can shift the center of rotation - to do this, you need to move the central frame marker to the required place. So, in Fig. 1 rotation is carried out relative to the top left vertex of the transformation frame. The Shift key allows you to rotate by an angle that is a multiple of 15°.
To tilt, you need to move the middle or corner marker of the transformation frame border while holding down two keys - Ctrl and Alt (in Mac OS - Command and Option).


To add a perspective effect in Free Transform mode, drag the top or bottom corner handle by pressing the key combination Shift+Alt+Ctrl (on Mac OS - Shift+Option+Command) - fig. 2.
Activate command Distortion(Distort) from the free transformation mode is enabled by the Ctrl key (in Mac OS - Command) - fig. 3.

Fragment deformation
As a result of choosing a command Editing(Edit) -> Transformation(Transform) -> Deformation(Warp) a mesh is superimposed on the fragment, the editing of which is performed by changing the position of the nodes and the angle of inclination of the guides (Fig. 4).
To apply the changes and exit this command, press Enter (Return on Mac OS).

Content Aware Scale
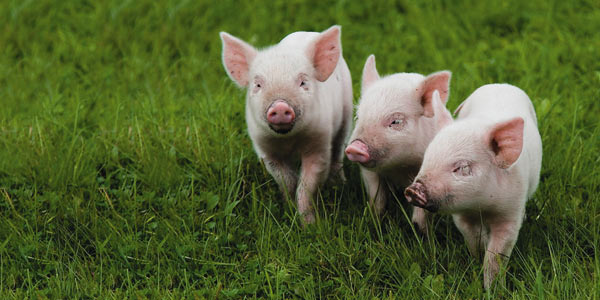
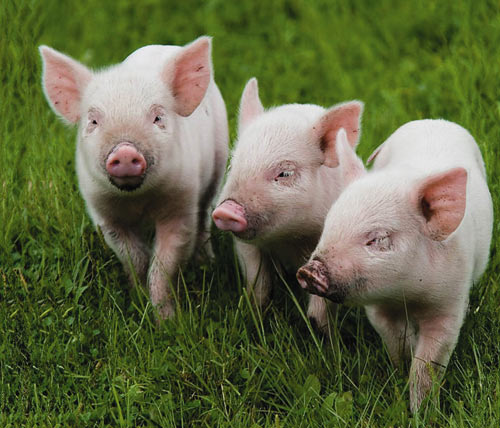
Content-aware scaling allows you to resize an image or portion of an image without affecting people, buildings, animals, etc. With normal scaling (command Free transformation- Free Transform) all pixels are treated equally, and content-aware scaling mainly affects background and background pixels. Moreover, this scaling allows you to protect the selected area or areas containing colors close to skin tones from transformation. So, in Fig. 5 A the original image of a cow is presented, and in Fig. 5 b— the result of normal scaling. As you can see, the image of the cow has been flattened along with the background - the choice of command was unsuccessful.


Rice. 5. Original photograph of a cow (a); the result of applying the Free Transform command (b); the result of using the Content Aware Scale command without presetting the tool (c); result of using the Content Aware Scale command with selection protection (d)
In Fig. 5 V And G the result of using the command is presented Content Aware Scale(Content-aware scaling). In Fig. 5 V the command was executed without preliminary settings, and in Fig. 5 G The cow image was protected from scaling.
To protect a fragment, you need to create a selection, save it as an alpha channel, and then, before scaling, select the name of the alpha channel from the list in the tool properties panel Protect(Protect) - fig. 6.
To protect against scaling of pixels whose color is close to skin tones, use the button with the image of a person in the properties panel. The result of this button is shown in Fig. 7 b.
Puppet deformation
Puppet warp mode appeared in Photoshop versions CS5. This amazing tool allows you to deform certain parts of an image without affecting other parts of it. In puppet deformation mode, a mesh is applied to the object, editing which leads to deformation of the fragment. But, unlike the team Deformation(Warp), puppet warping transforms an object not using mesh nodes and guides, but using pins.
Pins are indicated by bold yellow dots, which can be moved and the grid rotated relative to them. Moreover, the pins perform a dual role: protecting a fragment of the image and, conversely, deforming it. For deformation, active pins are used, which are marked with a black dot in the center, and inactive pins fix part of the image in place.
Let's look at the basic actions with pins:
1. Adding a pin is done by simply clicking the mouse in puppet warp mode.
Note. To enter this mode, run the command Editing -> Puppet Warp to exit the mode - press the Enter key (in Mac OS - Return) or the button on the property panel.
2. Clicking on the created pin selects it, causing a black dot to appear in its center.
Note. To select multiple pins, click on them while holding down the Shift key.
3. To move a pin, you first need to select it and then drag it while holding down the mouse button (Fig. 8).


4. To rotate the mesh around a pin, you must activate the pin, and then do one of the following:
- To rotate manually, you need to move the mouse pointer to the pin while holding down the Alt key (on Mac OS - Option). When a circle with a curved arrow appears, drag the mouse while holding down the button (Fig. 9);
- to rotate the grid to specified angle, required in the properties panel from the list Turn(Rotate) select item Auto(Auto), and enter the required value in the adjacent field.
5. If part of the grid overlaps, you can change its position - two buttons are used for this Depth(Pin Depth) located on the properties panel.
6. To remove a pin, use any of the following methods:
In addition to working with pins, the properties panel allows you to adjust the elasticity, frequency, and coverage area of the mesh. It is also possible to show it or turn it off:
- parameter Mode(Mode) - determines the elasticity of the mesh. In most cases the value is used Normal(Normal) - fig. 10;
- parameter Frequency(Density) - is responsible for the distance between grid nodes, the value is mainly used Normal(Normal);
- parameter Extension(Expansion) - is responsible for the coverage area of the mesh: the larger this value, the larger the outer edge of the mesh (Fig. 11). The default is 2 pixels;
- checkbox Net(Show Mesh) - displays or removes the mesh.
With puppet deformation, you can easily rotate an arm or leg (Fig. 12 A), bend a straight line into a circle or into some number, for example, eight or nine (Fig. 12 b).
Puppet warping can be applied to layers, vector shapes, text, layer masks, and vector masks. If it is necessary to deform an object, it must first be placed on new layer.


Rice. 12. Examples of using puppet deformation: a - stand on the bridge, b - bend St. George's ribbon to the nine
Group filters Distortion
Almost all group filters Distortion(Distort) produce geometric distortions, creating three-dimensional or other shape-changing effects. Let's name some of them:
- Diffuse glow(Diffuse Glow) - adds color to the image with glow and noise;
- Ocean waves(Ocean Ripple) Ripple(Ripple) and Wave(Wave) - used to simulate ripples and waves on water;
- Twisting(Twirl) and Zigzag(Zig Zag) - used to create circles on water or a swirling effect (Fig. 13);
- Bias(Displace) - deforms the image based on the displacement map, which is an alpha channel saved in PSD format;
- Glass(Glass) - creates the impression that there is glass on top of the image, the pattern and structure of which can be adjusted in this filter;
- Curvature(Shear) - allows you to bend the image along the curve that is drawn in the preview area. In some cases, this filter can be replaced with the command Editing(Edit) -> Deformation(Wrap).
Only three filters from this group can be applied using the filter gallery: Diffuse glow(Diffuse Glow) Glass(Glass) and Ocean waves(Ocean Ripple).


Rice. 13. Examples of using the Zigzag filter from the Distortion group: a - for drawing circles on the water, b - for curling the edges of the frame
Distortion correction
Filter Distortion correction(Lens Correction) is designed to correct defects created by the lens when shooting. This can include barrel and pincushion distortion,
Vignetting or chromatic aberration.
Filter(Filter) -> Distortion correction(Lens Correction).
In the preview area, you can overlay a grid on the image by clicking Moving the grid(Move Grid) - it is enabled by default. With its help, correction results can be easily tracked. The filter also has tools Hand(Hand) and Scale(Zoom) to scroll and zoom the image. Correction can be performed with two tools:
Adjustment of chromatic aberration, vignetting and perspective occurs on the tab Custom(Custom) using the appropriate sliders.
In Fig. Figure 14 shows an example of correcting barrel distortion resulting from shooting a book cover at a very close distance.

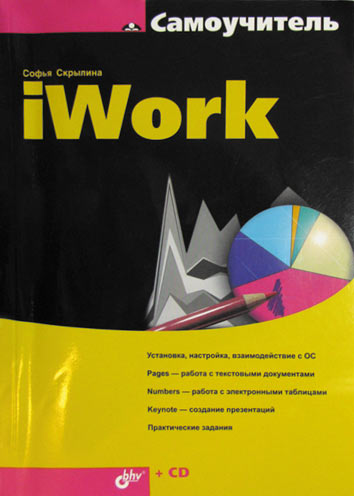
Rice. 14. Examples of using the Distortion Correction filter to correct barrel distortion: a - original image, b - correction result
Correcting perspective
Filter Correcting perspective Vanishing Point is used to correct perspective planes in an image, such as the side walls of buildings, floors, roofs, or any other rectangular objects. In this filter, you should construct planes that coincide with the image planes, and then start editing them: drawing, cloning, pasting from the texture clipboard, or transforming. All elements added to the image are automatically scaled and transformed in accordance with the constructed perspective planes, so the result of the correction looks very realistic.

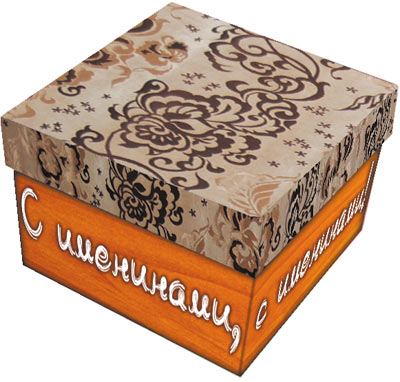
Rice. 15. Examples of using the Correct perspective filter to apply a texture and inscription to a box: a - original images of the box and two textures, b - correction result


In Fig. Figure 15 shows the original image of the box and the result of applying a texture to all faces of the parallelepiped, resulting in a wrapper effect. As can be seen from the picture, the text of congratulations is also printed on the box and is oriented in accordance with the side edges.
The filter dialog box opens with the command Filter(Filter) -> Correcting perspective(Vanishing Point), on the left side of which the filter tools are located. Let's look at the tools used to create the above effect.
Tool Create plane(Create Plane) creates a plane using four corner nodes. After defining four vertices, the perspective plane becomes active and the bounding box and mesh are displayed, which are usually indicated in blue (Fig. 16 A).
If errors occur when placing corner nodes, the plane becomes invalid and the color of the bounding box and grid lines changes to yellow or red. In this case, the nodes should be moved until the lines turn blue. You can also delete an unsuccessful plane using the Backspace key (in Mac OS - Delete) and create the plane again.
After creating the plane, the tool becomes active Edit plane(Edit Plane), which allows you to edit the position of nodes and the angle of inclination of the plane. The position of the node can be changed by simply dragging the mouse, and a slider can be used to rotate the plane Corner(Angle) in the tool parameters Edit plane(Edit Plane) or the Alt key (on Mac OS - Option). If you hover your mouse over the middle frame edge marker while holding down the Alt key (on Mac OS - Option), the pointer will change to a curved arrow. Moving the mouse will rotate the plane.
If you need to create a new plane, reselect the tool Create plane(Create Plane) and define the four vertices of the future face. To create interconnected planes, after creating the first plane (the mother plane), drag the middle node of the desired frame edge while holding down the Ctrl key (Command on Mac OS). As a result, a child plane will appear (Fig. 16 b). If the plane being created goes to the side and does not coincide with the edge of the image, change the angle of inclination for it.
Note. Editing corner nodes of the mother and child planes is impossible!
Once the perspective planes have been created and their nodes edited, you can begin applying texture. Therefore, you need to exit the filter window for a while, confirming all your changes with the Ok button. In Fig. 16 V five created planes are presented, which will later be used to apply texture.
It is better to place the texture for each face on a separate layer to make it more convenient to edit the result in the future. In our case, we have two pairs of connected planes (the side edges of the lid and the box itself) and one plane located on top edge covers. Therefore we will need three new layers.
You need to copy the texture image to the clipboard, select an empty layer in the palette Layers(Layers) and open the filter dialog Correcting perspective(Vanishing Point), and then select with the tool Region(Marquee) the desired plane and paste a fragment from the clipboard. When you move the mouse pointer, the texture will automatically fit into the plane. After applying the texture to each face, remember to exit the filter dialog box with the changes applied, otherwise all the textures will be located on the same layer. In Fig. 17 shows the result of applying textures to the edges of the box, as well as the palette Layers(Layers).


To place text on the side surface of the box, you need to create a text layer in the current or new document, copy it to the clipboard, and then paste it in the filter window onto a previously selected plane.
Filter Plastic
Filter Plastic(Liquify) allows you to distort individual areas of the image: shift, move, rotate, reflect, bulge and wrinkle pixels. It is used to create caricatures, retouch and correct photographs, and perform artistic effects.
The filter dialog box is called by the command Filter(Filter) -> Plastic(Liquify). All tools are located on the left side of the window, and their settings are made on the right side.
In Fig. 18 shows an example of using a filter Plastic(Liquify) to create a puppet effect.
Eye enlargement performed using an instrument Bloating(Bloat). To treat each eye, you need to use a fairly large brush, the size of which should exceed the size of the eye (Fig. 19).

It is better to set the brush speed quite low - in the example we used a value of 30. You should perform several clicks of the mouse in different places eyes, while maintaining its rounded shape.
Instruments were used to make the mouth smaller Wrinkling(Pucker) and Deformation(Forward). Puckering is applied to the corners of the mouth, with a few clicks made on each of them. To narrow your mouth even further, you need to move the corners of your mouth towards each other with a tool Deformation(Forward) - fig. 20.

The same tools used to make the mouth smaller are used to narrow the nose. As you work, you may need to reduce the brush size for more detailed processing. A tool was used to sharpen the chin Deformation(Forward).
To complete the effect, the whites, pupil and iris of the eyes were processed with instruments Dimmer(Burn) and Clarifier(Dodge), and also made color correction of the image in the dialog box Hue/Saturation(Hue/Saturation).
In addition to creating caricatures, the listed tools are often used to correct photographs. So, in Fig. Figure 21 shows an example of correcting a portrait of a man.
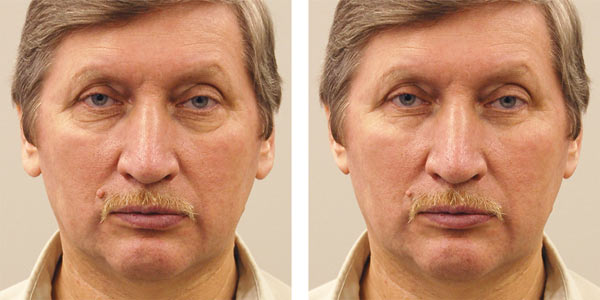


Rice. 22. The process of portrait correction with the Deformation tool: a — reduction of the earlobe; b - lower lip tightening
Tool Deformation(Forward) the following fragments were processed:
- earlobes - to make them smaller and closer to the head (Fig. 22 A);
- underlip- to change its shape (Fig. 22 b).
Tool Wrinkling(Pucker) other fragments were processed:
In addition to the correction filter Plastic Can be used to create various artistic effects. In Fig. Figure 24 shows the result of processing lily petals with a tool Twisting(Twirl). By default, rotation is clockwise; to rotate in the opposite direction, you need to hold down the Alt key (in Mac OS - Option). Stamens and pistil are processed with a tool Bloating(Bloat).

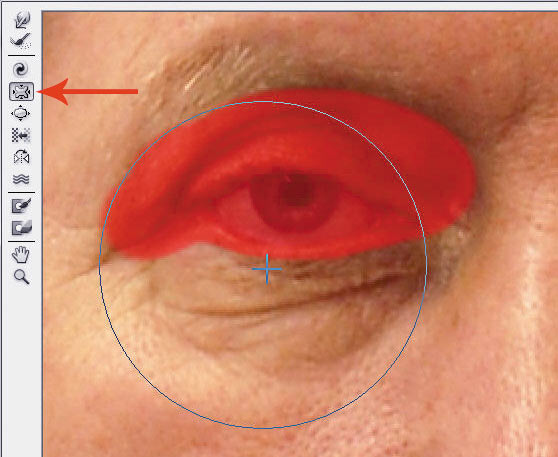
Rice. 23. The process of correcting a portrait with the Wrinkling tool: a - reducing a mole; b - reduction of bags under the eyes, the protected area is indicated in red

Warp text
To bend text, a special function is used, which is called by clicking on the button Deformed text(Warp Text), located on the tool's properties panel Horizontal text(Horizontal Type). The convenience of this function is that it does not rasterize the text, allowing you to edit it after deformation. Moreover, all settings are saved and can be changed as many times as you like.
In the tool settings, you can select the distortion style and set the magnitude of the effect vertically and horizontally. So, in Fig. 25 style was used to deform the text Flag(Flag).

We haven't looked at all of the Photoshop tools you can use to perform various kinds deformations. Behind the scenes there are many tools of the 3D group. But the examples given show that the capabilities of Photoshop are indeed very diverse.
To give the created banner great expressiveness and attractiveness, you can apply different effects to each layer. Let's see what effects Adobe Photoshop offers for layers and how to apply them. You should first make the appropriate layer active. Let's make effects for Layer 1 labeled SD.
Click on Layer 1 in the Layers palette to make it active.
Select the menu command Layer - Layer Style (Layer - Layer Style). A menu will appear on the display with a list of commands that control the application of effects to the selected layer.
The commands of this menu, starting with the second, have the following effects:
Drop Shadow (Shadow outside) - adds a shadow that is cast by the contents of the layer;
Inner Shadow (Shadow inside) - adds a shadow that lies inside the layer, creating a feeling of it being moved away or raised;
Outer Glow - adds a glow emanating from the layer outward; Inner Glow (Glow inside) - adds a glow inside the layer;
Bevel and Emboss - makes it possible to add different compositions of highlighting and shading layers that create the effects of relief and beveled edges;
Satin (Atlas) - adds shading within the layer, creating the effect of configuring the shape of the layer;
Color Overlay - fills the layer with color;
Gradient Overlay - fills the layer with a gradient;
Pattern Overlay - fills the layer with a pattern;
Stroke - outlines the outline of an object on the current layer using color, gradient or pattern. Typically used for objects with rigid boundaries, such as text.
Apply the Bevel and Emboss effect to the active layer Layer 1.
Select the Bevel and Emboss command from the Layer - Layer Style menu. The Layer Style dialog appears on the display.
Position this dialog so that it does not overlap the image in the document window to create the changes that will occur when adjusting the characteristics of the effect.
This dialog consists of two panels. In the left panel - Styles is checked and the name of the selected effect is highlighted - Bevel and Emboss. On the same panel you can select, by setting a flag, other available effects from the above.
If the flag is set to the left of the effect name, this effect will be applied to the layer after closing the dialog with the OK button. To cancel the effect, simply call up the dialog and clear the corresponding flag.
Make sure that the Preview flag is checked in the Layer Style dialog. In this case, all configurations of characteristics made in the dialog will be immediately displayed in the figure.
It must be emphasized, however, that the default stat values are good and almost always make for more colorful effects. In the drawing in the document window you can see how the SD inscription will look with the default values of the effect characteristics.
Adding a relief effect
The effect of relief of the inscription is created by the composition of highlighting (Highlight) and shading (Shadow), the characteristics of which are determined by the appropriate controls. In each of the groups, you can select the color of the shadow or glow by clicking on the swatch, the degree of opacity of this color (Opacity) and the pixel blending mode (Mode). The default values usually give the best results.
In the Style drop-down list, you can choose one of 5 options for this effect.
View different variants effect by selecting them from the Style drop-down list, then select the Inner Bevel style.
Selecting different options from the Technique drop-down list, review the likely edge formation methods, then select the Smooth option.
The Depth parameter allows you to change the degree of shading. The Size parameter controls the size of the bevel, and the Soften parameter controls the rounding of the edges.
Check how the effect changes when you change the Depth, Size and Soften properties and choose the best values for these characteristics.
The Up and Down switches determine the position of the highlight in relation to the contents of the layer.
See how the effect changes when you set the Down switch, then set the Up switch.
The Angle parameter determines the angle at which light falls from the layer or onto the layer. If the Use Global Light flag is set, then the global angle is used, which determines the angle of incidence of light on the entire image. If this flag is cleared, then a local angle is applied, which sets the angle of incidence of light on the active layer. To set the global angle, use the menu command Layer - Layer Style - Global Light (Layer - Layer Style - Global Light).
Click in various places radial scale Angle (Angle) and observe in the figure how the nature of the effect changes at different angles of incidence of light. Choose the best angle from your point of view.
By changing the Altitude parameter, check how the effect changes as the height of the light source changes and select suitable value this parameter.
Click OK to close the Layer Style dialog. The selected effect will be applied to Layer 1.
Please note that after introducing the effect in the Layers gamma, under the line with the active layer Layer 1 the title of the effect applied to the layer appeared, and to the right of the layer name there was an icon in the form of the letter f inside a snow-white circle, which means that the layer was used Effect. To the left of this icon is a triangular toggle that allows you to toggle the display of the titles of the effects applied to the layer on and off. To the left of the effect name - Bevel and Emboss - there is an icon in the form of an open eye, with which you can toggle the display of the effect in the document window.
You can apply multiple effects to one layer at once. Add another effect to Layer 1 - Drop Shadow (Shadow outside). To call up the Layer Style dialog, we'll use a different method.
Click the Add a layer style button at the bottom of the Layers palette and select Drop Shadow from the menu that appears with a list of effects. The Layer Style dialog appears on the display.
The left panel of the dialog already has the Drop Shadow flag checked and the effect controls are shown on the right.
The selected effect simulates the shadow cast by the contents of a layer. And this effect, made with the default parameters, you see in the document window.
Blend Mode
The Blend Mode and Opacity controls determine the blending mode of the pixels and the opacity of the shadow, respectively. The default shadow is black. But for a selected object, this shadow color is not the best. Let's choose a different shadow color, closer to the color of the inscription.
Click on the color prototype box to the right of the Blend Mode drop-down list. A dialogue will appear on the display Color Picker(Color palette).
If this dialog overlaps the document window, move it to the side to show the result of your color selection in your drawing.
Click on the spectral scale - the narrow vertical stripe - in the blue color area. The color space of the selected color will be displayed in the color field on the left.
By clicking the mouse in different places in the color field, watch how the color of the shadow in the drawing changes. Choose a blue color that is more suitable, from your point of view, for the shadow.
Close the Color Picker dialog by clicking OK.
The Angle parameter determines the angle at which the light hits the layer, and the Distance parameter determines the distance at which the shadow is cast. These two parameters can be changed interactively, directly in the figure.
Position the mouse pointer, which will take the shape in the document window, over the shadow cast by the SD label.
Press and hold left button mice.
Without releasing the left mouse button, move the mouse pointer near the label. The shadow of the inscription will also move along with it. As you move, the current Angle and Distance values will be displayed in the corresponding input fields of the Layer Style dialog.
Achieve a more rational position of the shadow and release the left mouse button. The Spread parameter determines the degree of clarity of the shadow.
Move the Spread slider to set the shadow sharpness to a more appropriate degree.
Use the Size slider to adjust the size of the shadow.
Review how this parameter changes the effect, and select a new value for it if you think necessary.
In the Contour drop-down list, you can select the shape of the shadow contour. If you set the Anti-aliased flag, the outline will be smoothed. The Noise slider allows you to add noise to the shadow.
Close the Layer Style dialog by clicking OK. The name of the second effect, Drop Shadow, applied to Layer 1, will appear in the Layers palette.
Select the menu command File - Save to save the document.
By clicking the button on the right top corner document window, close the current document.
Keep in mind that all effects that are applied to a layer are related to its content. As you edit the layer, the effect changes accordingly.
In this tutorial I'll show you how to create a cool, unusual effect for text.
Preview:
Let's start by creating a new document. I chose a small size of 500x300 px. Fill the background green #74a103:

After that, create a new layer, select the tool EllipticalMarqueeTool(Oval area) and make a selection, fill the selected area with color # b6 e100 .

Remove selection with Ctrl+ D and add blur Filter > Blur> GaussianBlur(Filter - Blur - Gaussian Blur) with the following settings:

The result should look something like this:

Now you need to add text. To do this we use the tool horizontalTypeTool(Horizontal text) and write the text. The author uses the Futura font, but you can use any font you like.

Now let's start creating an unusual effect for our text. Rasterize the text layer Layer >
Rasterize >
Type(Layer - Rasterize - Text), or RMB on the text layer - Rasterize type. Duplicate a text layer using a keyboard shortcut Ctrl+
J. Hide the bottom original layer with the text by clicking on the eye in the layers palette. Apply the following style to the top duplicated layer:
Gradient Overlay by color #
fffca6 To #
cce80d:

This is what you should get:

Let's start transforming the top text layer Edit > Transform > Skew(Edit - Transform - Tilt), you should get something similar to my picture:

Now we need to add highlights to the letters. Create a new layer and make a selection on it using the tool RectangularMarqueeTool(Rectangular selection). Fill the selection with white.

Click Ctrl+ Dto deselect. Applying blurFilter > Blur > GaussianBlur

You can see the result in the picture below:

After that create a new layer using the tool RectangularMarqueeTool(Rectangular selection) make a selection and fill it with white as shown in the picture.

Deselect ( Ctrl+ D) and apply a filter Filter > Blur > GaussianBlur(Filter - Blur - Gaussian Blur) with the following settings:

Your image should look something like this:

Merge these two layers of stripes into one (Ctrl+E) and rotate as shown in the picture using Edit > Transform > Skew(Editing - Transform - Tilt)

Duplicate this layer several times and place stripes on each of the letters.

Merge all layers with stripes into one. While holding down the key Ctrl Left-click on the text layer to get a selection. Then click Ctrl+Shift+I, to invert the selection. While on the stripes layer, click Delete to remove excess.

Deselect it with Ctrl+
D.
We return to the hidden layer with the text, make it visible by clicking on the eye in the layers palette. Next, apply a transformation to the text Edit >
Transform >
Skew(Edit - Transform - Tilt) as in the picture below.

Click Enter to apply the transformation. Now you need to reduce the height of the letters using Edit > Transform > Scale(Editing - Transformation - Scaling).

Apply a Color Overlay layer style to this text. #689106.

It should look like the picture below:

Create a new layer on it using the tool PolygonalLassoTool(Polygonal lasso), create a selection as shown in the picture. Fill the selection with color #689106 .

Do the same with the remaining letters. It should look something like this:

Merge this layer with the previous layer with green letters.
Now you need to add volume to the letters. Let's use it again PolygonalLassoTool(Polygon Lasso) to create a selection. Using the tool DodgeTool(Clarifier) with the following settings:
Brush(Brush): 45 pixels,Range(Range): Midtones(Mid tones), Exposure(Exposition): 30%
.
Volumetric nail design is a beautiful and non-trivial manicure that is perfect for both a special occasion and an ordinary everyday day. Convex patterns on nails came into fashion not so long ago, but they managed to conquer many women and girls, because it is really original and looks great! But how to do such a manicure?
A little about volumetric manicure
Convex nail designs with various colorful details first appeared on the catwalks. It's no secret that couturiers always strive to attract attention to their fashion shows not only with flashy outfits: they use both makeup and hairstyles, as well as nail design. Many girls liked this unusual manicure, so it soon migrated to beauty salons. 
When performing this nail design there are several important rules which should not be neglected. To begin with, you should not decorate each of your nails in this way: the abundance of three-dimensionality on your hands will look provocative and inappropriate. This advice is especially relevant for everyday manicure - in a festive nail design such brightness is quite acceptable, but it is still important to observe the measure. 
Also try not to combine voluminous design with other bright and flashy manicure techniques, especially if there are several of them. An abundance of sparkles, rhinestones, color transitions and other interesting details will ruin this interesting and bright manicure - unfortunately, it does not tolerate competition! 
There are several techniques for volumetric nail design: the long-known and proven acrylic sculpting, the expensive and incredibly easy-to-use gel plasticine, as well as gel polish, which is used for this manicure in several variations. Each option has its own disadvantages and advantages, which are worth highlighting in more detail. 
Volumetric acrylic modeling
Despite the variety of new materials, acrylic powders to this day remain the most popular material for sculpting nails. They are not very easy to handle, and are also quite fragile - however, this material allows you to create incredibly beautiful and voluminous figures! 
Most often, such modeling is placed on an extended acrylic or gel nail, but a natural nail coated with your favorite polish or gel polish will also work. To perform this manicure, in addition to acrylic powder, you will need monomer, a sharp brush, dots and special glue for attaching the figure. 
Acrylic sculpting technique is performed in the following way: the monomer, previously poured into a suitable container, is mixed with powder, and the pattern you need is created from the resulting material. This can be done both on the nail and on the working surface: the second option is more convenient, but after that the finished sculpture must be glued to the nail. 
The resulting element attached to the nail must be covered with an acrylic or gel layer on top - this will extend the life of your nail, making it strong and resistant to external damage. 
Important rules when working with acrylic: try to create a shape as quickly as possible, and do not attach it to such fragile places of the nail as the gash area, the tip of the nail and the space near the cuticle. The first rule is due to the fact that acrylic hardens quickly, and the second will help the sculpting last longer on the nail. 
Gel plasticine for volumetric manicure
Gel plasticine is a new and incredibly convenient material that is much more comfortable to use than the long-familiar and beloved acrylic powder. It does not flow, does not blur, and does not leave behind any stickiness or unpleasant odor. In addition, there is no need to work with it hastily - before polymerization it does not change its properties in any way! 
The technique of sculpting with gel plasticine is simple and can be done even by a beginner: a small amount of plasticine is transferred to a nail pre-coated with gel polish, as well as a fat-free nail, and the required figure is modeled from it directly on the nail using dots, brushes or orange sticks. When you get the desired result, dry the layer in a UV lamp! 
If you create multi-colored figures that contain several colors of gel plasticine, dry each color separately so as not to spoil the existing result. Also, don’t forget to cover your sculpt with a top coat for longevity and brightness of your manicure! 
Volumetric design with gel polish
This season, voluminous manicures made using several gel polishes are very common. The most sensational design, known as “mirror drops,” is made using precisely this technique – several dots of the same mirror top are dripped onto a mirror gel polish using a dot, and the resulting result quickly polymerizes in a lamp. It's really simple! 
The famous “knitted sweater” is also made with the help of gel polish, which looks like pigtails located directly on the nails. A thick gel polish of a suitable color is applied in a thin strip exactly in the center of the painted nail. Suitable patterns extend from it to the sides: ovals, circles, diamonds or any shape you like. This is enough painstaking work, but this cool design is worth the effort. 
Now you know how to make voluminous nail designs in various interesting techniques. They have their pros and cons, but what is more important is that each of these methods will help you create a unique and memorable manicure! 
Embossing on paper is gaining more and more popularity every day. This technique is used to decorate anything: notebooks, albums, scrapbooks, wall decor. The beauty of embossing on paper is that this simple activity can be done at home, and it does not require a lot of money. This method does not require any specific skills and is quite simple.
There are several home embossing technologies that you need to study to choose the most suitable one. Each technology includes the possession of certain tools: seals, stamps and relief stencils.
Most often, embossing on paper is used for scrapbooking. This exciting activity helps decorate your photo archive or diary, or decorate your room. IN Lately this type of needlework has become especially popular, because pleasant moments I want to preserve my life in a beautiful form, with pleasant memorable little things, photographs and clippings.
The technique of embossing on paper will help needlewomen to design their creations in an original and individual way. Since this activity is quite simple, skills are acquired very quickly. In addition, you can create while sitting at home at your desk, or by setting up a special work area.
Types of embossing on paper:
- Crimper (a special roller device that allows you to emboss on any piece of paper at a time)
- Foil stamping (most common type)
- Using a laminator and foil
- Debossing (pressing technique)
- Embossing using the embossing technique (used primarily for embossing on cardboard, book bindings and other rigid materials)
Gallery: embossing on paper (25 photos)


Imprint on paper with foil
 Most easy way get a beautiful and high-quality drawing - do foil stamping. Gold embossing is the most popular today. To do this you will need gold foil. This material looks very beautiful and presentable, so it is most often used for decoration in the Empire style with its characteristic monograms and curls. This type of embossing is often used to design business cards, diplomas, diplomas and certificates.
The easiest way to make a foil print is to use a sheet of paper with text or a design, foil and an iron.
On the printer The desired text or design is printed. A sheet of foil of the required size is placed on the image. If you need to get a colored drawing, then the foil should be colored on one side, in which case it should be this side that faces up. Place paper with a foil blank and the tip of the iron on a flat, hard surface and carefully iron it. It is important to thoroughly heat the entire surface of the sheet over the foil, in otherwise The image will not print well. You need to iron for 4-5 minutes, after which it is recommended to wait until the foil has cooled completely, and only then can you remove it from the design and admire the result.
Hot stamping can also be applied using special stamps or seals. To do this, the stamp (the main tool) must be heated strongly over an open fire and press the foil as much as possible onto the paper or any other material intended for embossing. After the procedure, all that remains is to remove the remaining foil from the finished product.
A convex pattern on leather, thick paper or cardboard can be made using a press or a special machine, which can either be purchased or made from heavy improvised materials. This method is very labor intensive and requires special equipment, so it’s difficult to do it at home.
Another quick way to create paper with an embossed foil design is to run a sheet of paper with the image and the foil on top through a laminator (without using any film, of course).
Paper embossing crimper
In some cases, it is impossible to make a relief on long paper manually using a print or stamp. Then it comes to the rescue special tool– crimper. The standard technique using stamps and small seals is not suitable in this case, since it is simply physically impossible to fully display a uniform relief print along the entire length of the sheet.
The main advantage of the crimper is the absence of restrictions on the length of the sheet, as well as ease of operation. However, there are also disadvantages:

One significant plus and a huge number of minuses discourage scrapbooking masters and craftswomen from using this tool to create their masterpieces. The creamer can be replaced embossed photo paper, which can be purchased at any photo salon.
You can also purchase or make your own embossing stencil, which will make it incredibly easy to create a relief print on paper.
Alternative embossing method
 There is another method, invented by one of the needlewomen while working. To implement it you will need rolling pin, water, paper, embossing folder and colored ink.
The embossing folder is painted on one side with colored ink, coloring the necessary parts of the pattern in required colors and shades. Then a sheet of paper damp from water (but not wet) is placed in a folder. After this you need with a steady hand walk the closed folder with a rolling pin, pressing the design evenly. In order for the design to be printed better, you need to press as hard as possible on the rolling pin.
Embossing on paper- this is the least expensive way to decorate a lot of everyday gray things, and the variety of techniques will satisfy even the most capricious needlewoman.