Option 1
1. Complete the sentences
a) A rectangular parallelepiped is a (flat, volumetric) figure.
b) U parallelepiped_____vertices, ________edges,______ faces.
c) Each edge of the parallelepiped is _______________.
d) The vertices of a rectangular parallelepiped_________________.
e) edges of a rectangular parallelepiped____________________.
e) faces of a rectangular parallelepiped____________________.
g) To calculate the volume of a cube, you need______________________.
2. Write down the figures that aremay have the shape of a rectangular parallelepiped:
A = 60 cm, in = 70 cm, With = 4 cm. Calculate:
2 3 g required?
5. From the figures shown in the figure, select those that are nets of the cube. If yes, then select the top edge and paint it blue. 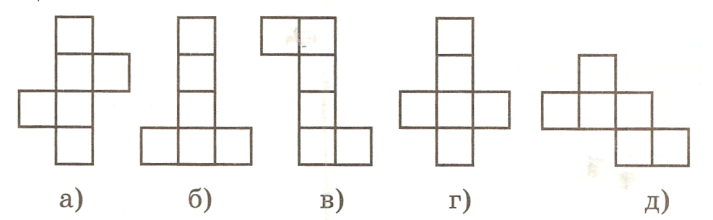
Test "Rectangular parallelepiped"
Option 2
1. Complete the sentences
a) Each face of the parallelepiped is __________________.
b) The dimensions of a rectangular parallelepiped are called _____.
V)U parallelepiped_______measurements.
G)MA - common edge of the faces ______________________________.
e) Point R - common apex of the ribs _________________________.
e) Point____common vertex of edges MA, MN And_____________________.
g) If two cubes have identical edges, then their volumes___________.
2.
a) watermelon; b) box; c) cake; d) pencil; e) ball; f) house; g) a piece of cheese; h) glass
3. Mark all the vertices of the cube with a blue pencil and all the faces of the cube with a red pencil.
4. Measurements of a rectangular parallelepiped: A = 20 cm, in = 30 cm, With = 9 cm. Calculate:
a) the length of all edges of the parallelepiped;
b) total surface area;
c) volume of a rectangular parallelepiped.
d) How much paint was used, if it is known that per 1 dm 2 3 g required?
5. From the figures shown in the figure, select those that are nets of the cube. If yes, then select the top edge and paint it red.
Test "Rectangular parallelepiped"
Option 3
1. Complete the sentences
a) A rectangular parallelepiped in which all dimensions are equal is called ________.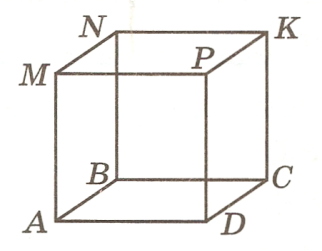
b) The faces of a cube are equal to ______________.
c) Each vertex of the cube belongs to _________ edges.
d) Edges equal to edge MN _________________________________.
e) edges equal to the edge MR_________________________________.
e) faces equal to faces DPKC _______________________________.
g) If a figure is divided into parts, then its volume is ______________.
2. Write down those figures that are NOTmay have the shape of a rectangular parallelepiped:
a) watermelon; b) box; c) cake; d) pencil; e) ball; f) house; g) a piece of cheese; h) glass
3. Color the top and bottom faces of the cube green, and the right and left faces of the cube blue.
Lesson type: formation of new knowledge.
Goals:
- to familiarize students with the variety of geometric bodies, which figures are called polygons, which figure is called a rectangular parallelepiped;
- systematization of knowledge about a rectangle, cube;
- development of spatial imagination and spatial representation;
- teach to analyze the data obtained and draw conclusions;
- increase motivation for the subject being studied.
Teaching methods:
- Conversation (with elements of a problem situation).
- Frontal laboratory work (research method).
Equipment: projector, slides with images of polyhedra; models of geometric bodies (cardboard and frame). For each student: a set of colored paper; glue; scissors; markers; plasticine; wooden sticks (12 pieces each - 3 groups of different lengths); a matchbox or box covered with white paper.
Lesson structure:
- Organizational moment, setting the lesson goal (1 min.)
- Historical background – introductory talk (2 min.)
- Introduction to new material (26 min.)
- Primary consolidation of the studied material (5 min.)
- Homework (3 min.)
- Lesson summary (3 min.)
DURING THE CLASSES
I. Setting the lesson goal
II. A little historical background
We are surrounded by many objects. They differ in shape, size, material from which they are made, color,…. People are interested in the different qualities of these objects. Mathematicians are interested in their shape and size.
The balls you have played with many times are spherical in shape, although they are all different sizes. Many celestial bodies have a shape close to the shape of a ball, including our planet. The glass and pencil are shaped like a cylinder.
Please note that the shapes of objects are very diverse and not every shape has a special name.
Since mathematicians study not the objects themselves, but their forms, instead of objects she considers geometric bodies: cylinder, ball, cube, etc. (samples of figures on the teacher’s desk). The names of many geometric bodies come from ancient times, and they originated from corresponding objects. For example, the terms “cone” (an object used to plug a barrel), “pyramid” (fire, bonfire), “cylinder” (roller), “rectangular parallelepiped” (rectangular planes) came from Ancient Greece.
Among the many different geometric bodies there is a large group of polyhedra. These figures (the teacher shows the figures) are polyhedra. And we will answer the question: “Why are these bodies called polyhedra?” during our lesson.
III. Introduction to new material
Funny little people came to visit the children: Pinocchio, Pencil, Dunno, Samodelkin.
Teacher: It's been a while since we've seen each other! Well, what interesting things happened to you during this time? What new did you learn? What have you learned?
The little people began vying with each other to talk about what they know and can do in geometry: what a triangle, quadrilateral, polygon are, how to measure length and area.
Teacher: Well done! How much we learned! We can say that you are now familiar with geometry. Not even all my students are so interested in it.
Pinocchio: And we are very interested!
Then he suddenly jumped up to the board and sang a song that he had just come up with:
Geometry and I are on first name terms:
We know how to fold rafts,
We know how to measure area
And calculate the perimeter.
We can sing songs about the circle...
We really like being able to!
Teacher: I see that you, Pinocchio, know how to fold not only rafts, but also songs. Have you ever built houses from cubes and blocks?
Pencil: No, we haven't done this yet. We were only familiar with flat figures.
Dunno: What is “flat”? You didn’t say such a word to us, Pencil.
Pencil: True, I didn’t say the word “flat”. But these are the figures we have dealt with so far. Triangle, quadrilateral, polygon, circle - all these are flat figures. Each such figure can be cut out from a sheet of paper, laid entirely on the table or attached to the board.
Teacher: Assignment for the whole class: cut out some flat shape from colored paper and place it on the table.
Samodelkin: But a cube isn’t a flat figure, is it? Can't you put it entirely on the table? No matter how you place it, it will definitely rise above the table.
Teacher: Yes, the cube is certainly not flat. Only they don’t call him a figure. In geometry there is a special name - body. A cube is a geometric body.
Pencil: A ball is also a geometric body.
Dunno: What other geometric bodies are there?
Teacher: Guys, help Dunno, name the geometric bodies. (Students name themselves, if a difficulty arises, funny people help them.)
Dunno: How interesting! Cube, sphere, cylinder, rectangular parallelepiped. Let's talk about the rectangular parallelepiped in more detail.
Pinocchio: What can we say about him? No matter how you put it, it is the same on all sides. All sides are rectangles.
Teacher: You were right about rectangles. Only each such rectangle is called not a side, but a face of a rectangular parallelepiped. Tell me, Pinocchio, how many faces does a rectangular parallelepiped have?
Pinocchio: Four.
Teacher: Answer this question too, guys. Do you agree with Pinocchio? (Students answer.) Only, Pinocchio, he was in a hurry again. And he answered incorrectly. In fact, a rectangular parallelepiped has six sides. Consider: it lies on one side, the other side is on top, and there are four more on the sides.
Square: Moreover, all faces are arranged in pairs. Look - opposite faces are equal rectangles.
Samodelkin: Look how I painted my cuboid.
Teacher: Each of you has a rectangular parallelepiped - this is a box or matchbox covered with white paper. Color them. Equal edges – one color. Say: “How many markers of different colors will be needed for this? (Answer: 3, students complete the task, under the control and with the help, if necessary, of the teacher and funny people.)
– We counted how many faces a rectangular parallelepiped has. Tell me, Pencil, what else can be calculated from a rectangular parallelepiped?
Pencil: Edges and vertices. The faces of a cuboid are rectangles, and their sides are called the edges of the cuboid.
Dunno: How many edges does a cube have?
Pencil: Do the math for yourself, guys.
Teacher: First, use a felt-tip pen (of the color that was not used) to highlight the ribs of your model, and then count their number.
Samodelkin concludes: A rectangular parallelepiped has twelve edges.
Dunno: How did you count so quickly?
Samodelkin: I imagined that the cuboid was our class. Its floor is a rectangle. There are already four ribs. The ceiling is also a rectangle. Four more ribs. There are already eight ribs. And four more in the corners of the walls. That makes twelve in total!
Teacher: Samodelkin very aptly noted that our classroom has the shape of a rectangular parallelepiped. Name the objects that have the same shape (students give examples).
At the same time, the cheerful little men took twelve iron (wooden) rods and made a rectangular parallelepiped from them.
Teacher: Try and you guys make a rectangular parallelepiped from twelve sticks, lying in front of each of you. (The students make crafts, and the teacher and funny men help those who have difficulties.)
Pencil: We have not yet counted how many vertices a rectangular parallelepiped has.
Dunno: Where are the vertices of a rectangular parallelepiped?
Pencil: Where three ribs meet.
Teacher: Assignment to the whole class: find the vertices on your model and count how many there are in a rectangular parallelepiped.
Samodelkin: A rectangular parallelepiped has a total of eight vertices. Look, I drew a rectangular parallelepiped and put numbers at all the vertices.
Teacher: Well done, Samodelkin, good drawing. You imagined that the rectangular parallelepiped is transparent. Now we see all its faces, edges, vertices. But depicting a polyhedron as transparent is not very convenient. The result is a set of lines that is difficult to understand. Looking at this drawing, it is impossible to understand how the lines are located in space.
In geometry, to facilitate perception, lines that are hidden from the eye of the observer are depicted not as solid, but as hatched. Then we will depict our polyhedron as shown on the board.
IV. Primary consolidation of the studied material
– Transfer this drawing to your notebook and highlight it, showing an edge, face, vertex in the drawing.
| G – edge R – rib B – top |
|
G – 6 R – 12 AT 8 |
V. Homework
While the guys were generalizing their knowledge of the new material, Pinocchio was cutting something out of paper.
Teacher: What are you doing, Pinocchio?
Pinocchio: I want to glue a rectangular parallelepiped out of paper. Now, I’ve already cut out six of its faces (shows). Now I'll start gluing them together.
Teacher: Separately cut edges are difficult to glue together to form a rectangular parallelepiped. There is a more convenient way. You can cut out a shape like this from paper.
– Here all the edges are connected to each other.
Pinocchio: This is a raft of six rectangles!
Teacher: You can imagine it as a raft, but in mathematics this is called a sweep. If you bend it like this, it will form a rectangular parallelepiped. And in order to be able to glue it, it is convenient to cut out our fruit with additional “tabs” for gluing.
(Equal rectangles are marked with the same letters.)
Homework:
1. Cut out a similar raft (larger in size) with “tongues” from paper and try to glue a rectangular parallelepiped from it. And to better remember the word parallelogram, the following homework:
2. From a given word (parallelogram), create as many new words as possible, consisting of letters of a given word (and each letter in a new word can be used once)
VI. Summarizing
Teacher: Our journey has come to an end.
Pinocchio: Do we already know everything about geometry?
Teacher: What are you talking about, Pinocchio! Of course not. Geometry is a very big science and it takes a long, long time to study it.
Dunno: Pencil, will we ever study geometry again?
Pencil: We definitely will! Now let's summarize.
Teacher: Please answer the following questions. What geometric body did we meet in class today? (Rectangular parallelepiped.)
Pinocchio: What shapes are called polyhedra? (A geometric body bounded on all sides by flat polygons.)
Give examples of these figures (Ball, cylinder, cone, pyramid, cube, ...)
Dunno: I still don’t understand how to choose a rectangular parallelepiped from all the polyhedra? (This is a polyhedron whose faces are all rectangles and parallel in pairs.)
Samodelkin: Show on your wireframe model the faces, edges, and vertices of a rectangular parallelepiped.
Pencil: How many faces, edges, and vertices does a rectangular parallelepiped have?
The cheerful little men say goodbye to the children, having previously provided assistance in marking the students for the lesson.
Course program
|
Newspaper no. |
Educational material |
|
Lecture 1. The problem of propaedeutics in the study of geometry and analysis of ways to solve it in the past and present |
|
|
Lecture 2. Peculiarities of mental development of children aged 10–12 years in connection with teaching geometry |
|
|
Lecture 3. Contents of the visual geometry course and the basis of the methodology for studying it |
|
|
Lecture 4. Geometric activity: learning to observe and developing spatial imagination |
|
| Lecture 5. Geometric activities: we teach graphic actions, design skills, form metric representations | |
|
Lecture 6. Methodology for organizing geometric activities of students using the example of forming ideas about symmetry |
|
|
Lecture 7. Priority forms of organizing educational work and forms of monitoring educational achievements |
|
|
Lecture 8. Computer technologies in the study of visual geometry |
Lecture 4
Geometric activity: learning to observe and developing spatial imagination
The study of geometric shapes and spatial relationships is based on specific actions that students must master. These are the activities of observing, imagining, measuring, constructing and graphic activities. In this lecture we will focus on the first two, and consider the rest later.
Observation
There is a deep misconception that there is no need to teach observation, you just need to say: “Look!”, and the eyes will do everything necessary. Why then do some students easily “read” the information they need from a geometric drawing, while others look but see nothing? Unfortunately, everything is not so simple, and perception, just like, for example, thinking, requires attention to its development. The development of the ability to observe occurs in the process of meaningful activity of perception, examination of geometric objects, through the formation of visual standards that reflect the basic geometric configurations, through familiarity with some special techniques that facilitate perception.
Want to know more?
Observation is meaningful, interpretive and goal-directed perception.
Observation is a human ability, manifested in the ability to notice significant, characteristic, including subtle, properties of objects and phenomena. N.'s development is an important task of forming a cognitive attitude and adequate perception of reality. Psychology. Dictionary / General ed. A.V. Petrovsky, M.G. Yaroshevsky. - M.: Politizdat, 1990.
Observation actions constitute the main content of tasks, the purpose of which is:
- creating a mental image of a geometric object;
- recognition of given configurations or figures;
- comparison of directly perceived objects or groups of objects.
Creating a mental image of a geometric object - this is perhaps the key point for the formation of geometric concepts, for studying the properties of geometric figures. And here it is extremely important that the creation of the image should take place in the process of properly organized, varied activities for a comprehensive examination of the object. Let's show this with the following example.
Example 1. Forming an idea of a rectangular parallelepiped.
It may seem that such ideas are formed in preschool childhood, because this is the most common geometric figure in the world around us. But that's not true. To verify this, just ask fifth-graders to answer the question how many faces a cube has. And to the question about the number of edges, the answers will be very different, even if the cube is in everyone’s hands. You will see that not everyone can even count the ribs!
To create an image of a parallelepiped, students need to carry out various practical actions with models of a parallelepiped, and under the guidance of a teacher who would lead and guide the examination process: indicating which features need to be highlighted, naming them, etc. Students should, taking the parallelepiped model in their hands (it can be a wooden block, a matchbox, a paper model glued together from a development, etc.), perform the following actions:
1) run your palm over its surface and feel that it consists of flat parts;
2) consider individual flat parts - the faces of the parallelepiped, determine their shape;
3) fixing the opposite edges, for example, with your fingers, visually establish their equality;
4) fix each face with your fingers (three fingers of one hand and three fingers of the other), determine the number of faces;
5) move your palm along the surface of the parallelepiped, highlighting the fracture line - the edge of the parallelepiped; select the faces whose boundaries this edge belongs to; select other edges belonging to the same faces; select a few more edges of the parallelepiped;
6) select groups of equal edges of the parallelepiped and determine their number; outline equal edges with a pencil of the same color;
7) select the vertices of the parallelepiped; placing it between the palms, determine the features of the location of the vertices;
8) fix each vertex with one finger and count their number;
9) choosing one of the vertices, determine the number of edges converging at this vertex; compare the lengths of these ribs (by eye; by running your finger along them; by measurement); do this for other vertices; notice that three edges of different lengths converge at each vertex;
10) fix attention on the faces converging at one vertex: their number, sizes.
What is the difference between the mental image created as a result of such a comprehensive and detailed study and the image that arises from ordinary visual demonstration? Exactly the same as between ideas about a car, one of which is created after viewing a photograph, and the other after a test drive and the opportunity to “dig into the engine.” The image that is created as a result of independently performed actions is filled with knowledge about the properties of the object, otherwise it is just a photograph.
The research described uses very different activities. And simple tactile actions and movements that are “in use” for every child from infancy (for example, hand movements that fix one or another element of the object being studied that is highlighted at the moment, focusing attention on it; at the same time, students can come up with methods of fixation themselves). They help to carry out and guide more complex actions that combine visual comparison, comparison and analysis of individual elements, determination of their quantitative characteristics, synthesis of these elements into a single whole and identification of key features of the object under study.
In fact, observation here also acts as a research method, since the proposed set of actions represents a plan for systematic observation. Have students do the research described and then ask them to share what they know about the box.
The solution of the problem comparison of directly perceived objects requires students to be able to notice common features and differences in the objects under consideration, to find significant ones among them, and thereby serves to form concepts.
Example 2. Figure 1 shows two groups of lines. How do the lines of one group differ from the lines of another?
The comparison task in this task is formulated directly. By comparing the lines of each group, students should see that the lines of the first group do not have self-intersections, and the lines of the second group have self-intersections.
Example 3. Figure 2 shows two parallelograms. Show that these parallelograms are equal in area.
Here the comparison problem is not explicitly formulated, but is the essence of the problem, since to solve it students need to notice that both parallelogram data can be redrawn into the same rectangle. This will mean that the parallelograms are equal in size. There is another solution, which is that one of these parallelograms can be redrawn into another. This can also be “seen” in the figure: by mentally “cutting off” a triangle from the first parallelogram and “attaching” it to the opposite side, we get a second parallelogram.
When we challenge students the task of recognizing geometric objects, We pursue two goals - the formation of a complete image of the object of study, its recognition and discrimination in various spatial positions, in more complex configurations, as well as the development of geometric vigilance and observation in students.
Example 4. Find the rectangles in Figure 3.
The peculiarity of the picture is that it contains two figures that are not rectangles, as well as two squares. To cope with this task, students must, firstly, remember that a square is a rectangle, and secondly, see a square located in an unusual position for them. The peculiarity of the perception of geometric objects is such that figure 4 is perceived as a rhombus if students are familiar with the rhombus, otherwise - as a quadrilateral that is not a square. If students do not identify this figure as a square, it is necessary to suggest to them mentally, and in case of difficulty, practically, to rotate it so that the square takes on a more familiar horizontal-vertical arrangement for recognition.
Example 5. How many triangles are shown in Figure 4?
This exercise is aimed at developing the ability to recognize a triangle in a more complex configuration, and in this case, both as an integral part of another figure, and as a union of other figures.
Techniques to help perception
Let's now talk about techniques that can help students solve the problems considered. One of the methods is subject configuration modeling. It can be used when performing the exercise described in example 5. In order for the teacher to guide students’ perception, focusing their attention on a particular triangle, teach them to switch their gaze from the “big” triangle to the “small” triangles that make it up, he can offer students a model made from colored paper. Perception training is that by adding two triangles together, students see one triangle, separating them, they again see the two original triangles.
Another trick is highlighting configuration elements with color. This can be either coloring the figure included in the configuration, or tracing its outline. So, for example, when analyzing the drawing from example 3, students can highlight one of these parallelograms with color. At a certain level of mastery of the technique, when using it independently, some students paint over one of the parallelograms, others highlight only its outline, and still others highlight the outlines of two parallelograms with pencils of two different colors. The creative use of a mastered technique plays a significant role in solving problems.
Example 6. How many diagonals does a convex pentagon have?
The article was published with the support of the SAIT.UA web studio. The company offers you services for the development of corporate websites, online catalogs, online stores, as well as website design and support, graphic design, media planning, hosting, creation of exclusive custom software products and more. You can find out detailed information about the web agency and contacts on the website, which is located at: sait.ua.
Let students draw two diagonals coming out of it with a pencil of the same color from a certain vertex of the pentagon. And so on for all vertices, each time moving to a new vertex, changing the color of the pencil. So they use five different colored pencils and make 10 lines. Next, they will notice that they drew each diagonal twice (segments of two different colors). Therefore, a pentagon has 5 diagonals. The described method of solution allows the teacher to ask students the question of the number of diagonals of a hexagon, heptagon, or centagon. The method they found can easily be transferred to any polygon: the number of diagonals is equal to half (each diagonal was drawn twice) of the product of the number of vertices (the number of pencils used) by the number of diagonals emerging from one vertex (there are three less than the number of vertices).
Another technique for perceiving complex configurations is to determine brute force logic. This technique (along with highlighting with color) takes place, for example, when performing the task from example 6. The logic of enumeration here consists in sequentially drawing all the diagonals coming out of each vertex of the pentagon. But let's look at another example.
Example 7. In Figure 5, find all 35 triangles.
This is an example of one of the most difficult tasks for students in grades 5–6, so the number of triangles is already specified in the formulation; in addition, it will stimulate self-control actions. Successful completion of the task depends to a greater extent on how the selection of triangles included in a given configuration will be organized, and not on the level of development of perception. Here the teacher must help students by equipping them with enumeration logic that consistently reveals all the triangles before their eyes. The preliminary stage of solving the problem consists of highlighting with color the shapes that make up the pentagon: students are asked to color first the inner pentagon, then with pencils of two other colors two groups of equal “small” triangles.
Let us describe one of the solution options. Let's fix the vertex IN As a reference point, the walking direction is clockwise. Let's count the number of small triangles - five triangles equal to a triangle AVO, and five triangles equal OBF. (If equal triangles were previously colored, for example, red and blue, then instead of using letter designations it is more convenient to “label” the triangles by color - five red triangles and five blue.) The number of triangles made up of two small triangles (one red and one blue) , is equal to ten - two at each vertex of the pentagon. The number of triangles made up of three small triangles (two red and one blue) is five - one at each vertex of the pentagon. Now let's count the number of triangles that include a small pentagon. The number of triangles made from a pentagon and two blue triangles is five - one at each vertex of the small pentagon. And finally, the number of triangles made up of a pentagon, three blue and one red triangle, there are five of them - according to the number of vertices of the pentagon. Total, 35 triangles.
Imagination
By imagination we will understand the operations of mentally manipulating geometric images and creating new images. This is not a creative imagination that creates fundamentally new objects; these objects are new for students, since they are born by them independently based on the transformation of already known objects. This is a recreating imagination - the presentation of new objects in accordance with their description, drawing, diagram.
Imagination is formed on the basis of perception, therefore, by enriching the experience of perception and observation, encouraging students to create images, the teacher develops their imagination. Any complex action, before becoming the property of the mind, must be realized externally. Mastering the actions of the imagination occurs in the process of transferring practical actions to the internal plane.Want to know more?
Imagination is the creation of images of objects and phenomena that have never been perceived by a person before. The development of imagination is facilitated by situations of incompleteness, encouragement of many questions, stimulation of independence, independent development. Krutetsky V.A. Psychology. - M.: Education, 1980.
Want to know more?
Interiorization is the transformation of the structure of objective activity into the structure of the internal plane of consciousness. Psychology. Dictionary / General ed. A.V. Petrovsky, M.G. Yaroshevsky. - M.: Politizdat, 1990.
Actions of imagination are the content of tasks, the purpose of which is:
- creating a mental image of a geometric object based on its description;
- creating a mental three-dimensional image of an object based on a drawing
- spatial body or projection drawing;
- mental operation of an image.
Talking about creating a mental image based on its description , we will consider two cases: firstly, when, in the course of solving a problem, students need to mentally construct a new image from familiar images as from elements of a construction set, and secondly, when we are talking about the geometric location of points.
Let us give examples of two tasks where parallelepipeds act as “constructor elements”.
Example 8. There are two ways to lay out a parallelepiped from four cubes. Will the surface area of the parallelepiped be the same in the first and second cases?
Students must mentally assemble a parallelepiped from four cubes, but it is quite difficult to mentally check that there are only two such possibilities. This must be done using real cubes.
Example 9. The volume of the parallelepiped is 64 cm 3, width - 4 cm, height - 2 cm. The length of this parallelepiped was reduced by 3 cm. Determine the volume of the resulting parallelepiped.
Here, mentally reproducing the situation allows you to find a more rational way than sequentially calculating the length of a large parallelepiped, reducing it by 3 cm and calculating the volume of a new parallelepiped. While searching and discussing ways to solve the problem, the teacher asks students to imagine that the parallelepiped specified in the condition is cut into two parallelepipeds, and the length of the “cut” parallelepiped is 3 cm. Hence, in order to solve the problem, it is necessary to reduce the volume of the original parallelepiped by the volume of the “cut” one. parts.
As a result of completing tasks on the GMT, students must “see” a figure as a set of points that have a certain property, as if making the points merge into a single figure.
Example 10. Draw a straight line and label it the letter a. Construct several points located from line a at a distance of 2 cm. Where are all such points located?
When constructing points 2 cm away from a line, students must first “see” that the points form a line parallel to the line A, and then understand that there are two lines that satisfy the condition.
Task creating a mental image of a spatial body based on a graphic image is solved primarily for spatial figures. Before getting acquainted with the projection drawing, which is used in stereometry, in a course of visual geometry, it is useful to start studying spatial figures with drawings of glass, frame models, as well as solid bodies made of cubes or parallelepipeds, gradually abstracting images of material bodies and replacing them with a projection drawing.
Example 11. How many vertices, edges and faces does the polyhedron have (Fig. 6)?
A material object is easier to imagine. Using an image of a glass model at the initial stage of mastering the actions of creating mental spatial images and terminology associated with polyhedra allows students to “see” all the elements of the polyhedron, determine their number, location features, and shape of the faces. Both edges and edges are visible on the glass model.

Example 12. Figure 7 shows a wireframe model of a cube. Name the edges coming out of vertex M.
The image of the wireframe model is more abstract in nature, so its use is transitional in nature from the image of the glass model to the projection drawing. The edges are visible on the wireframe model, but the edges seem to be transparent, actually not visible.
Example 13. Shade the visible faces of the cube (Fig. 8), using a different color for each face.
A projection drawing is already a conventional image that you need to be able to read. The teacher draws students' attention to the fact that all the edges of a visible face are also visible. Students sequentially identify contours delimited by solid (“visible”) lines. A cube with three visible faces of different colors appears before their eyes.
Example 14. Figure 9 shows a rectangular parallelepiped facing the viewer with edge LN. Outline visible edges with solid lines, invisible edges with dashed lines..
The teacher offers students determine which faces have an edge LN and whether they will be visible. They then determine which edges of these faces are visible and trace them with a pencil. Next, to see which other edges are visible, they can use the object model of the parallelepiped, placing it in front of them as shown in the figure.
To mentally roll a cube from one face to another, you must have practical experience in performing these actions. In order for students to master the actions of mental manipulation of the image and its transformation, they must learn to translate practical actions with subject models into an internal plan. The simplest of these actions is changing the spatial position of an object, for example, moving in a given direction, turning. It is characteristic both on the plane and in space.
Example 15. The pyramid ABCD was placed on a sheet of paper with face ABC. Then they rolled to the edge of the BCD. Then we drove on. Each face leaves its own mark on the sheet (Fig. 10). Mark the traces of the corresponding vertices on it with letters.
The teacher can invite each student to perform the described actions with a pyramid model as follows: the student places the pyramid on a sheet of paper and traces the outline of the face with a pencil; rolls the pyramid to the other side and traces it again, making sure that the pyramid leaves the same mark as in the picture; labels the vertices on his drawing. As the task progresses (for example, after the second roll), the teacher can ask students to roll the pyramid mentally next time, and then test themselves. Then everyone continues their “snake” independently, first trying to perform the action mentally, and then practically.
The following example relates to graphic actions for constructing a figure.
Example 16. Figure 11 shows how to construct a rectangle. Describe the proposed method in words and complete the construction.
The drawing specifies only the final configuration obtained during construction; the stages of construction are hidden from students. Students can isolate the method of constructing a configuration only by using their imagination, based on their observations and knowledge of the properties of the figures included in it.
The teacher must direct the mental transformation of the situation in the right direction, trying to lead students from the final result of the construction to its initial stage, here they will have to move in the opposite direction, solve “in reverse.” He can invite students to mentally remove the rectangle from this drawing - after all, it appeared last in the drawing. Now all that remains is a circle and its two diameters. (Until this point, students may not see that the diagonals of a rectangle are also the diameters of a circle.) The teacher draws students' attention to the fact that the rectangle appeared when the ends of the diameters were connected in series. And here it becomes obvious that the construction must begin by drawing a circle and its diameters.
The most difficult for students are operations to transform the original image, in which it undergoes changes not only in terms of spatial location, but also structural changes. An example of such an action is the mental folding of a cube.
Example 17. Which points will align when gluing the development shown in Figure 12.
The completion of this task must be preceded by the students making this scan from a sheet of paper. It is necessary to invite students to fix one of the faces of the cube as the bottom and slowly fold the scan, paying attention to the location of the faces: which of the squares of the scan forms the top face, which ones form the side faces. Then you need to repeat the actions performed again, but now focus on which points and which segments are combined.
By folding a cube from different developments, students come to a certain technique for mentally folding a cube, which consists in the fact that it is convenient to imagine four squares arranged in a row as its side faces.
Let us give an example of a problem of another type, which also requires, when operating with an image, a transition from the plane to space and back.
Example 18. A broken line made of wire runs along the surface of the glass cube (Fig. 13). Draw this polyline on the image of the cube from the front, top and left.
An important feature of this task is that you can complete it not only by mentally turning the cube in the desired angle, but also by mentally changing your position relative to the cube - look at the cube from above, “go” to the right, etc.
Techniques to help your imagination
When mastering the actions of imagination, as well as when mastering the actions of observation, the techniques described above that facilitate perception provide significant assistance: using an object model, coloring. This can be seen from examples 13 and 14. In example 15, the coloring technique can also be used - each face of the pyramid can be “painted” in its own color; Rolling over a sheet of paper, such a pyramid will leave a “color trace” on it. Let us give an example showing the advisability of using enumeration logic in some cases when analyzing a drawing.
Example 19. How many cubes are needed to build the tower shown in Figure 14?
When counting cubes, students often forget about the ones that are not visible. To prevent this from happening, the teacher should discuss the logic of recalculation with students, drawing their attention to design features, for example, symmetry. The logic of recalculation is always based on some mental transformations of a given configuration (rearranging cubes, disassembling, etc.). To check the solution found, it is very useful to ask students to practically put together a structure from cubes.
Methodical workshop
1. Select from the literature or create several tasks on your own aimed at developing observation actions and developing imagination.
2. Do some research. Divide students into two groups of approximately equal strength. Ask the first group to classify a certain set of geometric figures according to their graphic representation, the second - the same figures, but cut out of paper. Students must select similar figures, explain how they are similar and how the other figures are not similar to them. The set under study may, for example, include: convex and non-convex polygons; figures whose boundaries consist of segments and arcs of circles. Students can suggest several reasons for classification, for example, for the set described above - to highlight polygons or to highlight convex figures. Compare the results of the first and second groups.
Literature
1. Wenger L.A. Perception and learning. - M.: Education, 1968.
2. Age and individual characteristics of students’ imaginative thinking / Ed. I.S. Yakimanskaya. - M.: Pedagogy, 1980.
3. Perception and action / Under. ed. A.V. Zaporozhets. - M.: Education, 1967.
4. Galperin P.Ya., Talyzina N.F. Formation of initial geometric concepts based on the organized action of the student // Questions of psychology, 1957, No. 1.
5. Zinchenko V.P. Productive perception // Questions of psychology, 1971, No. 6.